Thursday 1 December 2011

Advent, Summer Mini, December Frenzy....Phew!

Hello!  What a crazy, busy, fun time of year!  Tomorrow is the last day of school for two of my kids (one finished school last Friday, and one has one day next week to go), and I've been up to my elbows in teacher presents, end of year patents, and the like.  I'm sure it has been the same for you.

Today our new Summer Mini and the December Frenzy launched - WOW!

Here are the details of the December Frenzy:


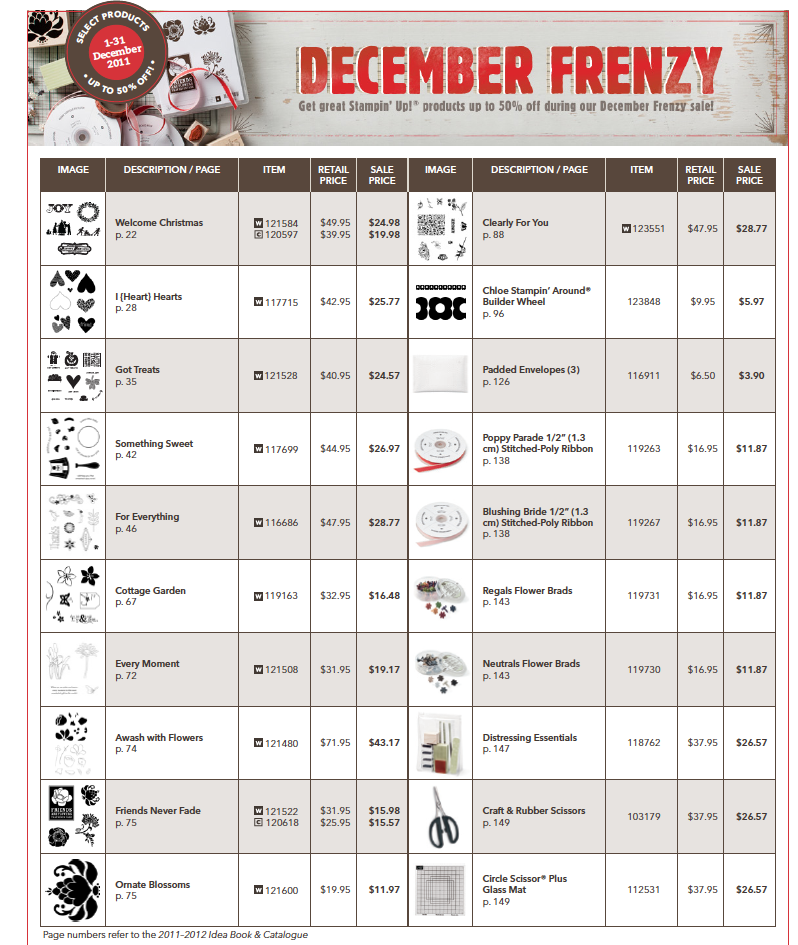
Or you can see more HERE.

The Summer Mini is gorgeous - hard to pick a favourite new product!  Plenty of lovely new stuff for Christmas, including glimmer paper (I've used it below).

Here is the Summer Mini, You can read it online HERE.


One of my favourite Christmas traditions is an Advent calendar.  in the past we've had Lego calendars, and those chocolate ones you buy at Target (the chocolate always starts to melt in our Summer heat before Christmas Day), and this year I was inspired to make one myself.

Here it is, and the instructions:


Two Tags Advent Calendar

Paper
•Whisper White card stock
• Real Red card stock:
•Lucky Limeade Cardstock
*1/2 sheet Red Glimmer Paper (121790,  $8.95 for two 12"x 12" sheets, Summer Mini Catalogue)

Stampin’ Up! Accessories
• Big Shot
•Two Tags Bigz Die (115954, $39.95)
• Timeless Type Junior Alphabet Medium Sizzlets Die (115951, $139.95)
• Scallop Circle Punch (119854, $33.95)
3.5cm circle punch (119860, $30.95)
Extra Large Oval Punch (119859, $33.95)

• 2-Way Glue pen
• Stampin’ Dimensionals
•White Bakers Twine (124262 $4.95) Summer Mini Catalogue
Cherry Cobbler 3.2cm Striped Grosgrain (I used Real Red, but it has retired)
Sticky Strip
SNAIL adhesive
2  small elastic hair bands

My Notes

1. Using the Big Shot, die cut 48 of the wide tags from the Two Tags die (I was able to cut three sheets of cardstock at a time, which helped speed up the process). 
2. Assemble by merely adhering two tags together to form a triangle shaped box. 
3.  Decorate each triangle box as desired - I alternated real red and lucky limeade cardstock with mine.  For the numbers, die cut red glimmer paper with the numbers medium sizzlets (you may wish to roll through the Big Shot twice to ensure a clean cut). 
4. Using a long piece of striped grosgrain ribbon (hemp twine would also work) attach a small hair elastic to both ends using a small strip of Sticky Strip.  This will make it easy to hang your Advent Calendar. 
5. Using Baker's twine, attach each box to the striped grosgrain as shown.
6.  Don't forget to put some treats in each box!  I put four small sweets in a small plastic bag, tied with red ribbon, as I have four children - you could put anything you like!

1 comment:

Unknown said...

Wow your advent calander fantastic. Such a great idea, I've been wanting to get the two tags die for a while,I'll be getting it in my next order for sure.

Getting closer....

It's nearly that time of year, where the retirement list comes out.  That means the in-colours we've loved the past 2 years are leav...