Ramblings of a sleep-deprived SAHM, papercrafter, and Independent Stampin' Up! ® Demonstrator.
Friday 21 December 2012
Clearance Rack Week 2
Monday 17 December 2012
Gift Card Holder Tutorial
As promised - the gift card holder tutorial.
You will need:
- Sticky Strip,;
- Paper Trimmer;
- 11cm x 9 cm piece of Cardstock;
- Co-ordinating DSp to decorate if desired ;
- bone folder or Simply Scored plus stylus,;
- embellishments as desired.
1. Take your 11cm x 14 cm piece of card stock and score it on the long side at 3.5cm and 9cm as per the photograph below:
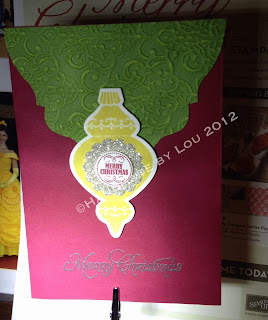
2. Apply sticky Strip to the edges of the shorter fold to form a pocket for your gift card. Be sure to check it will fit. If desired, you can use an Edgelit to make a cute cut away convex edge to the pocket, as shown, and a fancy edge to the top flap (pinking shears would work too).
3. Decorate and embellish as desired.
That's it! Embarrassingly easy. Once you have the measurements for the score lines, it practically makes itself!

Saturday 15 December 2012
Clearance Rack Blitz Week 1
I know, I'm a little late for the 14 December - 20th December Clearance Rack, I'm so sorry!
And, to make it worse, some things are sold out already!
Click on the link here for all the Clearance Rack Blitz Details!
To recap, the Clearance Rack is a temporary promotion where you can purchase some retired products for up to 70% off! No wonder they are selling out fast.
 |
As far as I know, the following products are already SOLD OUT!
Real Red Grosgrain ribbon
12 x 12 Regal Rose Smooth Cardstock
Christmas Greetings (Wood) Stamp Set
In Colour A4
Riding Hood Red 12 x 12
Gold Brads
Basic Gray Marker
Holiday Lineup Stamp Set
Soft Holly Wheel
Happy Christmas Mate Stamp Set
Contact me ASAP if there is something you fancy on the list - I can't promise it will still be available!
Thursday 13 December 2012
Monday 10 December 2012
Busy, Busy, Busy!
 I was intending to have a couple of posts planned in advance, but sadly, much of my spare time last week was spent standing in a line at Officeworks while the teacher present (a little photobook ) I made with MDS could be printed, and then, reprinted because the new girl who served me didn't realise their laser printer needed to be set to 85% lighter. Sigh.
 It was all OK in the end. Phew!
I was pleased with it - I would have probably shopped around for printing options if I hadn't been pressed for time, but I must say, at 20c per page, Officeworks was more economical than printing at home, although the colours weren't perfect.
I have found it a struggle to get near the computer to upload and edit photos, as my children are all on holidays now, and if the boys are playing Skylanders on the Wii, the girls are on the computer watching a movie. If the girls are playing on the Wii, the boys are playing Minecraft on the computer.....argh! And it's only the first week!
I'm hoping that I can "unplug" them today long enough to clean their rooms and put up the Christmas tree. Fingers crossed.
Maybe I can fit in some Christmas Card writing and mailing?
In Stamping news, I have something exciting to tell you:
We have never had the Clearance Rack in Australia, though it has been in the US market for ages. Wonder what will be on it?
Friday 30 November 2012
One down, three to go!
My eldest child finishes school for the year today, so I sent off her teacher present yesterday. I was also responsible for making a card and gift card holder from the entire class - also done!
I haven't had time yet to upload all the photos of the presents I've made, but I still have three teachers to go - my younger three finish school for the year next Friday.
Here's a collage of the gift card holder I made (with a dummy iTunes card to check for size) and the matching card from the class:
It looks a little small - I did the collage from my iPad while still in bed this morning!
Monday 26 November 2012
More Christmas Tags
I love using my scraps to make gift tags - so handy to have a stash of them; and a bundle of them make a nice present too!
These are some I made recently for the Mistress of Spice at Gordon Park. The Mistress of Spice sells fabulous gourmet fresh and frozen yummy curries from around the world (handy for the nights you don't feel like cooking) and also has an extensive array of cooking-related gifts and accessories. A one-stop shop! She also sells Handmade By Lou cards and gift tags!
These are some I made recently for the Mistress of Spice at Gordon Park. The Mistress of Spice sells fabulous gourmet fresh and frozen yummy curries from around the world (handy for the nights you don't feel like cooking) and also has an extensive array of cooking-related gifts and accessories. A one-stop shop! She also sells Handmade By Lou cards and gift tags!
Also, in case you were wondering, I can make a beautiful Gift Voucher up for the Stamper in your life - it would make a fabulous Christmas gift!
Friday 23 November 2012
Brisbane Heartfelt Stampin' Event
I know I haven't posted in a little while, but I'm sure you understand how crazy this time of year is! Lat weekend, I was lucky enough to attend the Stampin' Up! Heartfelt Stamping Event at the Brisbane Convention Centre. Three of my Downline attended with me, and it was so fun to go together.
What is a Heartfelt Stamping Event? It is a one day mini Convention. Half the day was made up of classes given by talented Stampin' Up! Designers and Demonstrators; the other half was made up of displays, a product playground where you were encouraged to get hands on with various tools and products, as well as interesting presentations given by talented Demonstrators.
It is also a chance to catch up with Demonstrators from all over the place, meet new friends, and get better acquainted with old friends.
I came away feeling energised, inspired, and once again proud to be part of this fabulous creative company. I learned new techniques, saw fabulous creations I can't wait to try to recreate myself. I also got two free stamp sets and the kits to make my own gorgeous projects - which of course, I didn't make there, because I was too busy chatting!
It also made me even more excited about Convention next year - because it will be held in the same venue! Awesome!
 |
| My friend, and upline Stephanie Pike gave an amazing presentation on using your clear acrylic blocks to stamp gorgeous backgrounds. Can't wait to try these techniques! |
 |
| These gorgeous creations were made by the talented and lovely Liz Collett who gave a class on how to make these pretties! |
 |
| I don't know who made this, but I love it! This was one of the displays. |
 |
| Kirsty Brown showed us how to make gorgeous paper bows and pretty wrapping for gifts - and I loved this cute "Teacher Gift" idea for Christmas Cookies in a jar. |
 |
| One of the cards made by Steph with her clever clear block techniques. |
 |
| Presents! Each attendee had the chance to get a free stamp from "Santa" (aka Aaron Scott) when we made a decoration and added it to the tree. |
 |
| One of several display boards filled with samples made by demonstrators. My sample is there too! |
 |
| My sweet friend and downline Michelle Hindmarsh made sure none of us faded away by bringing snacks to share. Cute, colour co-ordinated snacks of course! |
Thursday 15 November 2012
Christmas Stamp a Stack - what you missed!
I'm posting these photographs taken at 11:00pm with my iPhone - so please excuse the quality! Better to have poor photos than none at all, right?
Because I've just waved off my lovely customers from the Stamp-a-Stack I'll probably need to edit this post with further details later, I'm too tired to type much tonight!
Here are the cards we made - we did two each of five designs.
The first card used Cherry Cobbler and Wild Wasabi, and the Daydream Medallions stamp set (I love using a non-Christmas set for a Christmas card! Shows how versatile this stamp set is), and the matching framelit. This is the quickest and easiest card to make in bulk, I think.
The second card is pretty much the same - same colour combination and stamp set (Daydream Medallions) but I made a more obvious Wreath this time. The red dots are Cherry Cobbler glitter glue. I also used Cherry Cobbler embossing powder on the "Noel," but it looks a little pinker that Cherry Cobbler in this photo.
This was a break from the traditional red and green combination - Summer Starfruit and Raspberry ripple instead. I also used the stamp set and framelit set in the current promotion for November.
This one is CASE'd from a card in our Demonstrator magazine, Impressions. I changed it up by using the music notes roller stamp and embossing the background with Irridescent Ice embossing powder. It looks gorgeous and sparkly in real life!
Finally a second card using Summer Starfruit and the stamp set and framelit combo in the promotion.
I hope you've enjoyed them! I'm off to bed now.
Tuesday 23 October 2012
My October Class - What you missed
I did make some with Christmas toppers, but forgot to photograph them.
 |
| Stamps: Googly Ghouls Ink: Black Stayzon Paper: Pumpkin Pie, Whisper White other: Scallop Circle Punch, 13/8" circle punch, googly eyes (Holiday Mini) |
These are the cards we made. The first one features the Merry Minis Stamp and punch set (page 6, Occasions Mini). You really need the Stamp-a-Ma-jig to line up everything for this card.
 |
| Stamps: Greetings of the Season (p 8 Holiday Mini), Ornament Keepsakes Bundle (stamps and matching Framelits) Ink: as before Paper: Naturals White, Whisper White Other: Big Shot, White Baker's Twine |
But the project that had everyone excited was this pretty ornament made with the Big Shot, the Snow Flurry Bigz die, and a diet Coke can.
 |
| Linen thread, silver glimmer brad, Snow Flurry Bigz Die (Holiday Mini), Big Shot, 1" circle punch |
A great bit of urban art, or recycling, isn't it?
To make it, take your (clean, empty of course!) can, and cut off the ends. I used my craft and rubber scissors - they worked well. I wouldn't use my paper snips because I like to keep those bad boys very sharp. Then run the metal through the Big Shot with the snowflake die. I poked a hole through each snowflake individually with my old blunt paper piercer, and secured the layers together with a glittery silver brad. I wound some linen thread around the brad prongs. Then I punched a 1" circle of the can with a punch and glued it over the back to cover the brad prongs and to keep the linen thread in place, with a hot glue gun.
Seriously easy but gives a big "WOW!" I think a normal red Coke can would look awesome too. I am stockpiling my cans now because I might be giving these to the kids' teachers at Christmas this year!
I am also keen to try some other Bigz dies with a recycled can. I could see tea light candles in a flower, for example.
Subscribe to:
Posts (Atom)
Getting closer....
It's nearly that time of year, where the retirement list comes out. That means the in-colours we've loved the past 2 years are leav...
-
Welcome to the ESAD-SU Sale a Bration Blog Hop! This is my first Blog Hop, I'm very excited. You should have arrived from Linda's ...
-
The last (and first!) time I entered this challenge was #37.....oops, time flies! The colours to use are: Baja Breeze, So Saffron, More Must...
-
Long time lurker, first time poster for Kristina's Colour Challenge. The colours this week were Old Olive, Baja Breeze, Chocolate Chi...


