Showing posts with label Silhouette Cameo. Show all posts

Sunday, 7 December 2014

Book Club Christmas


Do you love to read?  I am an avid reader, and am almost always found with my head in a book (even if it is an e-book) when I get the chance.  I have joined a bookclub of like-minded friends and we meet up once a month.  I love this group!  I've enjoyed meeting new people, reading different books, and engaging in some intelligent conversation.  Each year at the end of year Christmas party I have made it a sort of tradition to give everyone a handmade card and a little bookmark.

Here's what my friends received this year:


I used my Silhouette Cameo to cut out a page of feather shapes from this gorgeous double sided card from the Occasions Mini, and stamped the word "JOY" from one of the new photopolymer alphabet stamp sets with black ink.


The card was a simple one layer card - Whisper White yardstick, Peace on Earth stamp set, and either Real Red ink or the new in-colour Mossy Meadow.

A simple enough token, but nice all the same, I think. :-)

PS- This stamp set is on the Year End Closeout on sale right now!  Run over to my Online Store now!


How's your Christmas preparation coming along?  You'll be pleased to know I've done about half my shopping, out tree is up, and we have decorations all around the house.  Haven't posted any Christmas Cards yet though!

Here's a festive photo of our cat in his favourite spot, checking out the tree.  He loves to chase loose baubles all over the house, especially at 3am!


post signature

Tuesday, 29 July 2014

School Fete Fun!

Whew!  I've spent the last two weeks frantically finishing off the projects I was making to sell at my children's primary school Fete.  It was a lot of work, but worth it, I think.  We only have the Fete every two years - thankfully!

Here's the stall I worked on, with other talented and crafty Mums from school !

I found that My Digital Studio and my Silhouette Cameo were invaluable, as I was mass-producing things to sell.  Saved me many hours!

I made mainly box frames, and I used Stampin' Up! card stock, DSP (mainly from my retired stash), and either the Big Shot (with the star framelit or now retired whale clearlit), glue dots and dimensionals.  Some of the shapes were imported from MDS into my Silhouette Library and cut out with my Silhouette Cameo.


I also used the star stencil, a dauber and Hello Honey ink to make these:


I also turned my hand to a few canvas creations:  

I painted the canvas with black Gesso and then used the Silhouette to cut out the words in white vinyl.

LOL, the following two were not sold at the Fete because my daughters decided they'd look better hanging in their rooms!

I painted the canvas with Modge Podge and applied the (retired SU!) DSP, then another coast of Modge Prdge and dabbed white Gesso on the edges.  The words were cut from vinyl with my Silhouette.

As above - Modge Podge, white Gesso, retired DSP and Vinyl.


I also made up some packs of cards and gift tags, and made some cute "Tooth Fairy" bags with my Silhouette and iron-on transfer paper onto little muslin bags.

I love how my crafty products do double-duty and make such cute and easy gifts and decor!


post signature

Sunday, 6 April 2014

Silhouette Framed Art Weekly Challenge


For a change I've made something!  I made this little framed artwork as a present for my niece.  I used a bit of Stampn' Up! DSP (from Sale a Bration); Basic Black cardstock, My Digital Studio  and my Silhouette Cameo.  I used white Silhouette vinyl on the glass of the frame for the cute Dr Seuss quote.

The link to the Silhouette Weekly Challenge is here:  http://blog.silhouetteamerica.com/2014/04/framed-art-weekly-challenge.html

I love the possibilities!  


Monday, 17 February 2014

MDS Hybrid Bookmarks


A friend of mine is a year 1 teacher, and at the start of each school year, he likes to give his students a little "welcome to my class" gift.  I made his students a bookmark to add to the package of goodies.  

You can make these without an e-cutter, obviously - especially now that we have the Tag Topper Punches I have featured on the blog here recently.  However, at the time I made these, I didn't have the punch yet, and I'd just purchased my Silhouette Cameo - so it just made sense to me to try it out, given I had 27 or so to make.  

I'll show you two ways of making these bookmarks - one with the Cameo and one without.

1.  Without an E-Cutter:

MDS Steps- Go into My Digital Studio, and open up a new document.  Make it the size that works with your home printer - A4 size.  

Of course, you could make your own images and words for your bookmarks, using the stamps and embellishments you already have in MDS (or for that matter you could just stamp on Whisper White Cardstock).  I loved the cute bookmarks in Book Buddies that Stampin' Up! designed in My Digital Studio, so I had to get those.  


If you'd like to get it as well, you can get it HERE


Once you've opened your new file, find the bookmarks.  They will be separated into background panels, images, and the words.


Then, layer them as you wish like this:


Make sure you use the "group" function when you have all your elements the way you want them, so you can move your bookmarks around without losing bits.

If you like, you can save this project as a .JPEG now, and print it out, and cut it out.  I like to even my bookmarks up first, to make it easier to cut them out.


To make them all straight, use the "Align" tool.  There, isn't that better?


Now, you can print it out, and cut out the bookmarks !

2.  With a Silhouette Cameo:

I'm sure the steps are similar with other e-cutters, but I have a Silhouette Cameo, so that's what I know.

First, I cut out a 12 x 12 Crumb Cake page of bookmarks:


I'm pretty sure the bookmark was one of the free shapes that came with my Silhouette or one of the kits. You could easily just make rectangles of course. 
I was able to fit 7 bookmarks to a 12 x 12 inch page. I saved the full page as a cut file so I can use it again and again.


Here they are, ready to decorate!  Usually I like to sponge the edges with Crumb Cake ink, but I didn't bother for these bookmarks.

Now for the Book Buddies images.  Don't bother creating your image in MDS and exporting as an SVG file - because only the parts of the image (3 digital stamps) will be exported.  This won't be the case with some other stamp sets.

I imported all the elements (.PNG and .SVG) into my Silhouette library.  I have the Designer Studio Edition, specifically for this purpose.


I've gone ahead and imported most of the .SVG files in MDS into my Silhouette library already, but you can also import .JPEG and .PNG files.

Here's what it looks like in my Silhouette library:


As you can see, I've already assembled and saved my bookmarks as a printable in my library.  Why reinvent the wheel each time?

Once you've assembled (and grouped) your Book Buddies the way you want them, you'll want to send them to your printer to utilise the "Print and Cut" feature.  I love this.

First, make sure you select "Registration Marks" because this is how the clever Silhouette will know where the images you printed are on the page.

Then, send it to your printer for printing!
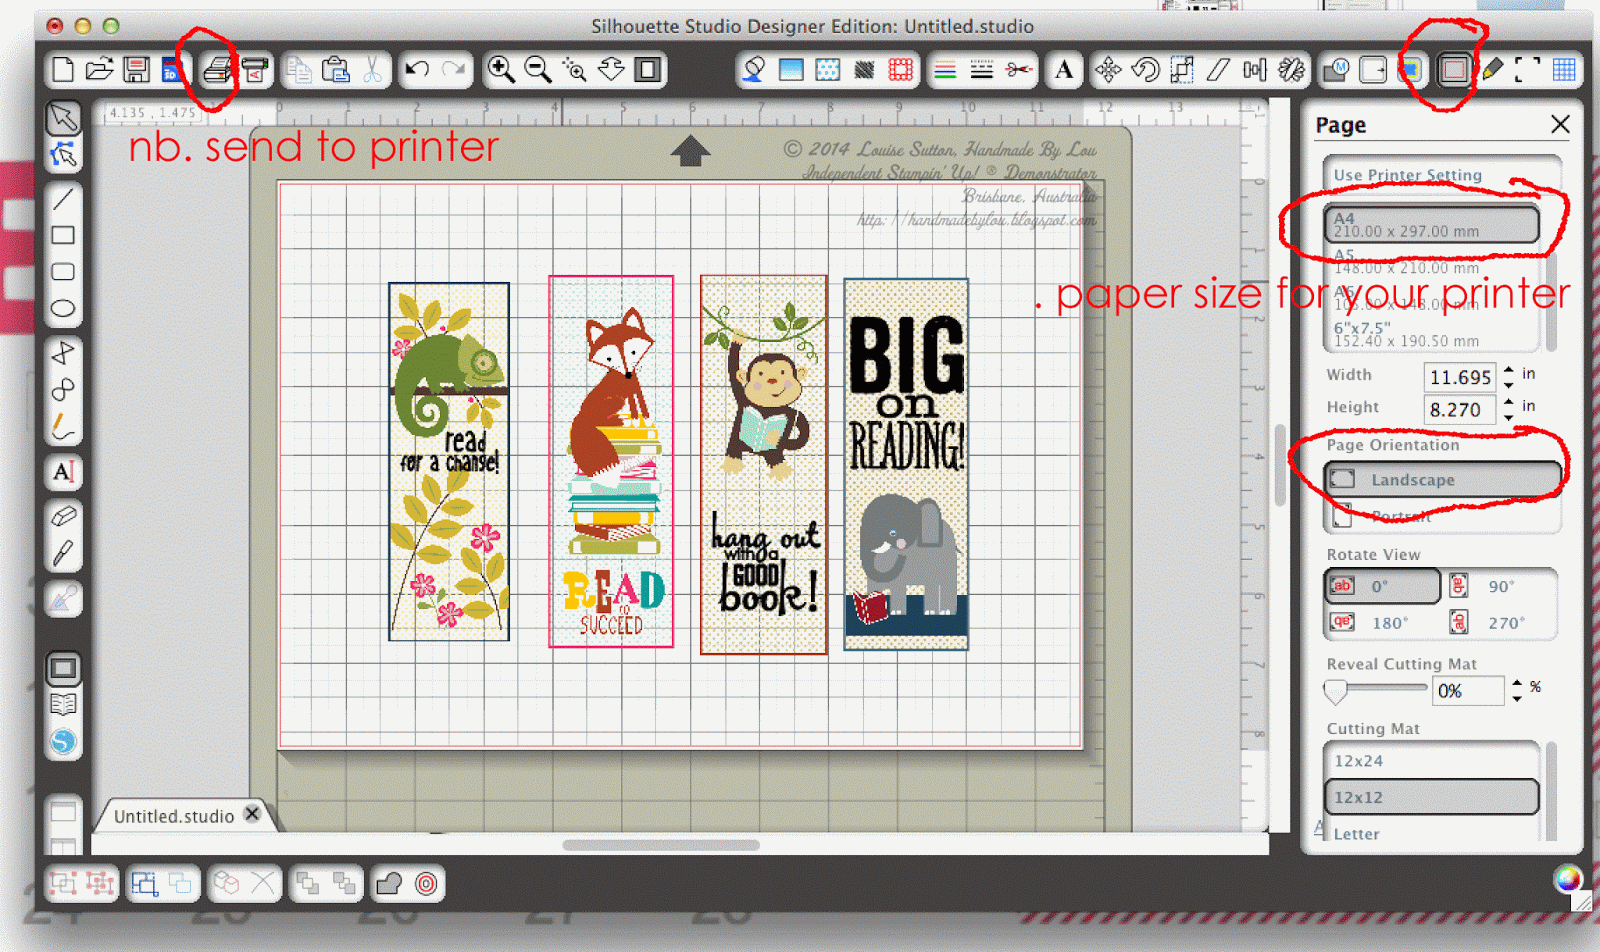
Oops, forgot to show the registration marks on this screen!  They should be there as in the previous picture.
 When you've printed out your bookmarks, they will look like this:


I printed mine on adhesive label paper (Silhouette has their own brand, but I didn't have any of it.  I used some I found at Officeworks instead.) but of course I could have used Whisper White card stock and my snail adhesive.

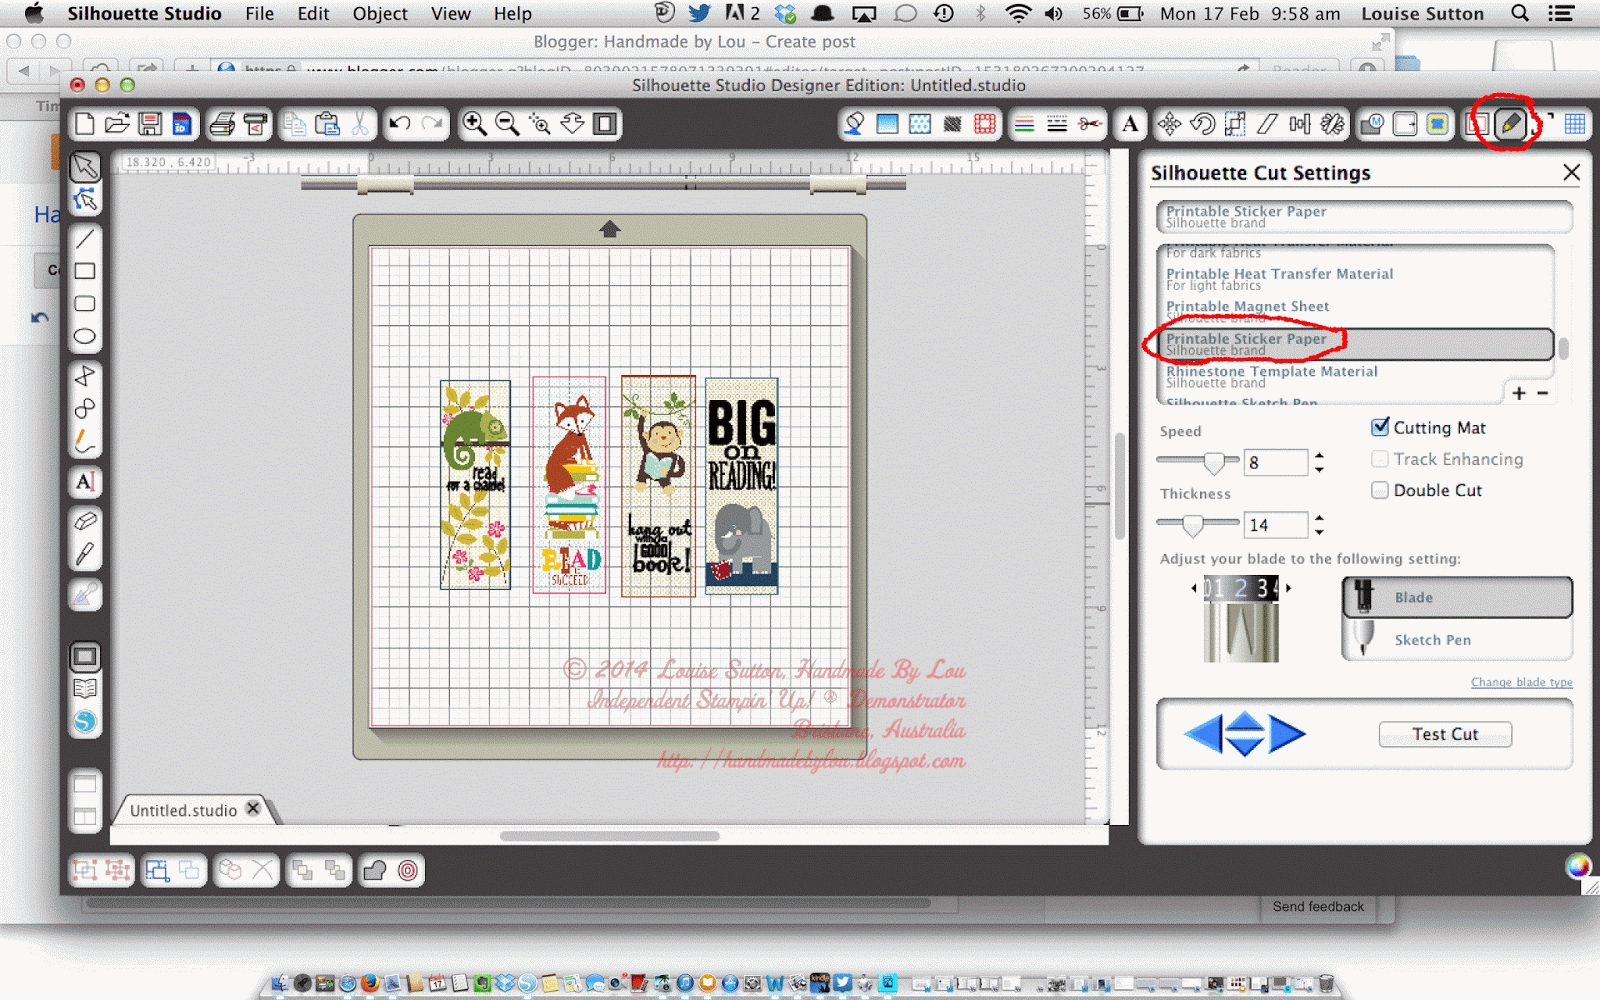
In order for your Silhouette to cut the right lines (in this case, the outside of the Book Buddies panels) you need to tell it what to cut out.  To do this, I used the "Trace" feature, as follows:
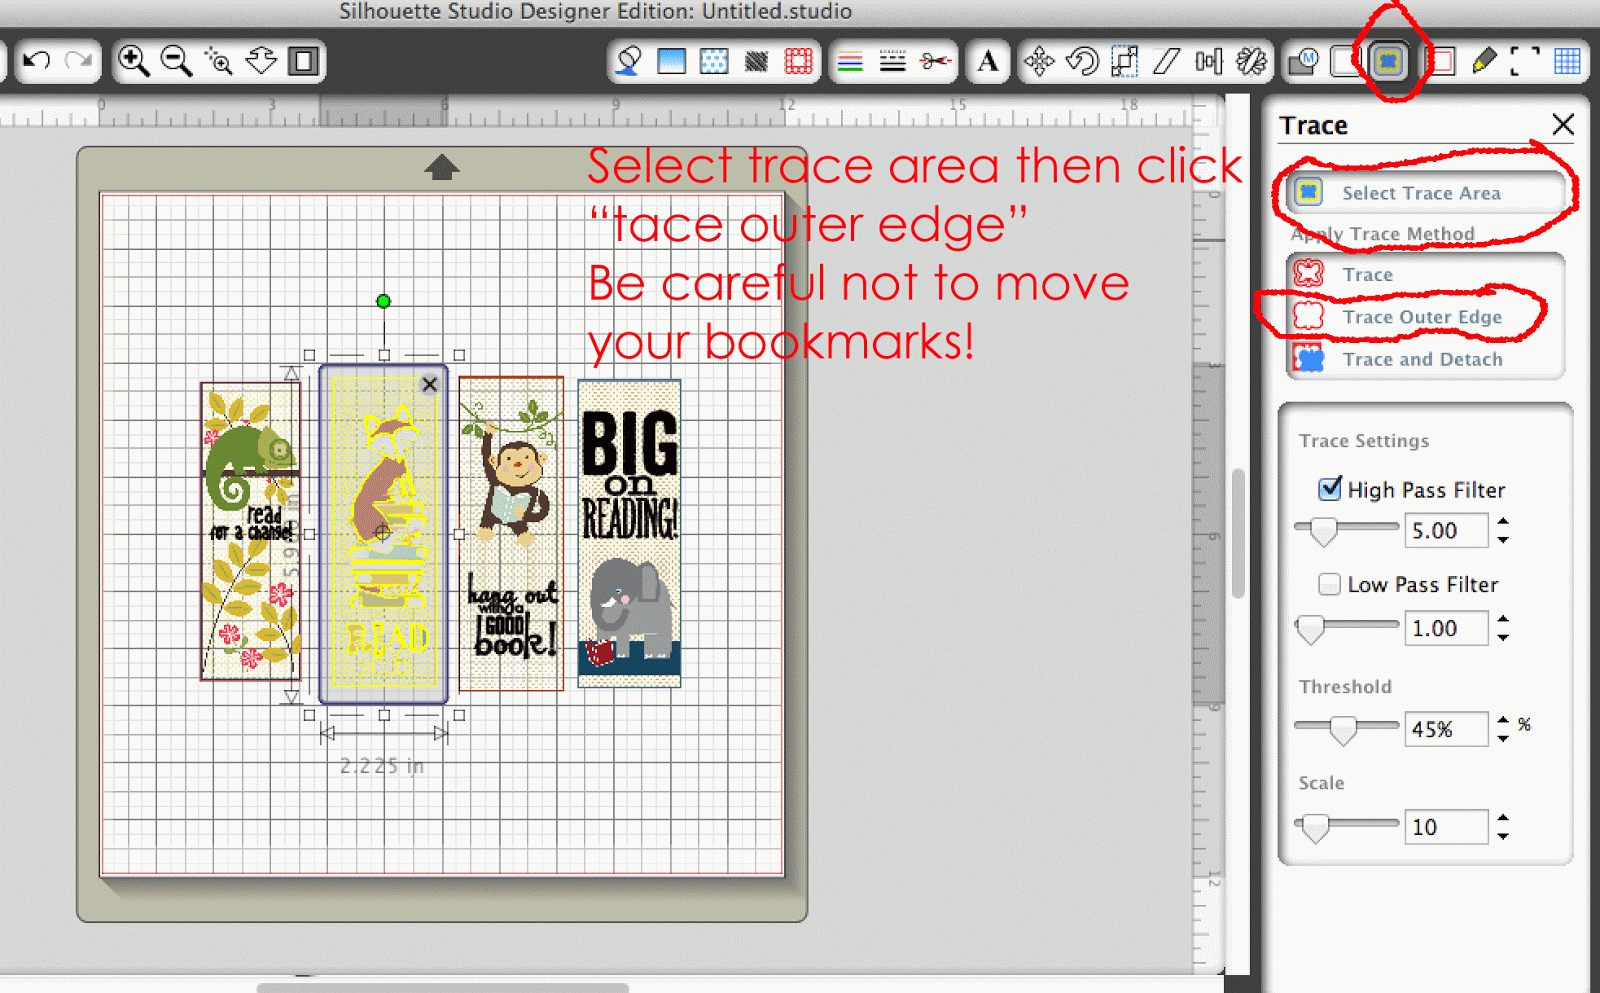
Ugh, "TRACE"  not "tace!"  

Load your printed bookmarks back into your Silhouette, making sure the little black square is lined up with the blade (that's how it will "read" the registration marks) and make sure your cut settings are appropriate for your material.  For example, the sticker paper I used is thinner than the Silhouette brand sticker paper, so I had to tweak the settings and experiment a little to get it to cut perfectly.  I found a blade setting of 1 was just fine.  

Then press cut or "send to Silhouette" and let it do the work.


Adhere your printed images onto the bookmarks, decorate with ribbon or twine, and you are done.


I hope this was helpful to anyone using MDS with their Silhouette Cameo.  Let me know if you have any questions, and I'll try my best to answer them.  

What do you think of my Blog and Facebook Page makeover?  I made it in MDS in a few minutes.  I needed to freshen things up a little!


Tuesday, 24 December 2013

Merry Christmas from our home to yours.


Aren't my 4 Things precious?  

I'm busy today cleaning my house as we are hosting a big Christmas lunch with my inlaws tomorrow.  I have excited Things who keep pawing at presents wrapped under the tree, trying to guess what they are.  

Two of my lovely downlines, Kath and Michelle, came over last night for an informal "team Meeting"  which was really just a catch up before Christmas.


I made them each a calico bag with heat transfer + MDS + my new Silhouette machine, which I forgot to take a picture of.  Michelle gave each of us these sweet tubes filled with mini M&M's, and Kath made us earrings, which she wrapped in this gorgeous mini milk carton.

I've also been tinkering with my new Silhouette cameo and vinyl.  Here's my first project:


I made it a little crooked ( :-( ) but I still quite like it!


I hope you, dear readers, enjoy a wonderful Christmas and a fabulous New Year!

Getting closer....

It's nearly that time of year, where the retirement list comes out.  That means the in-colours we've loved the past 2 years are leav...