Showing posts with label My Digital Studio. Show all posts

Sunday, 30 November 2014

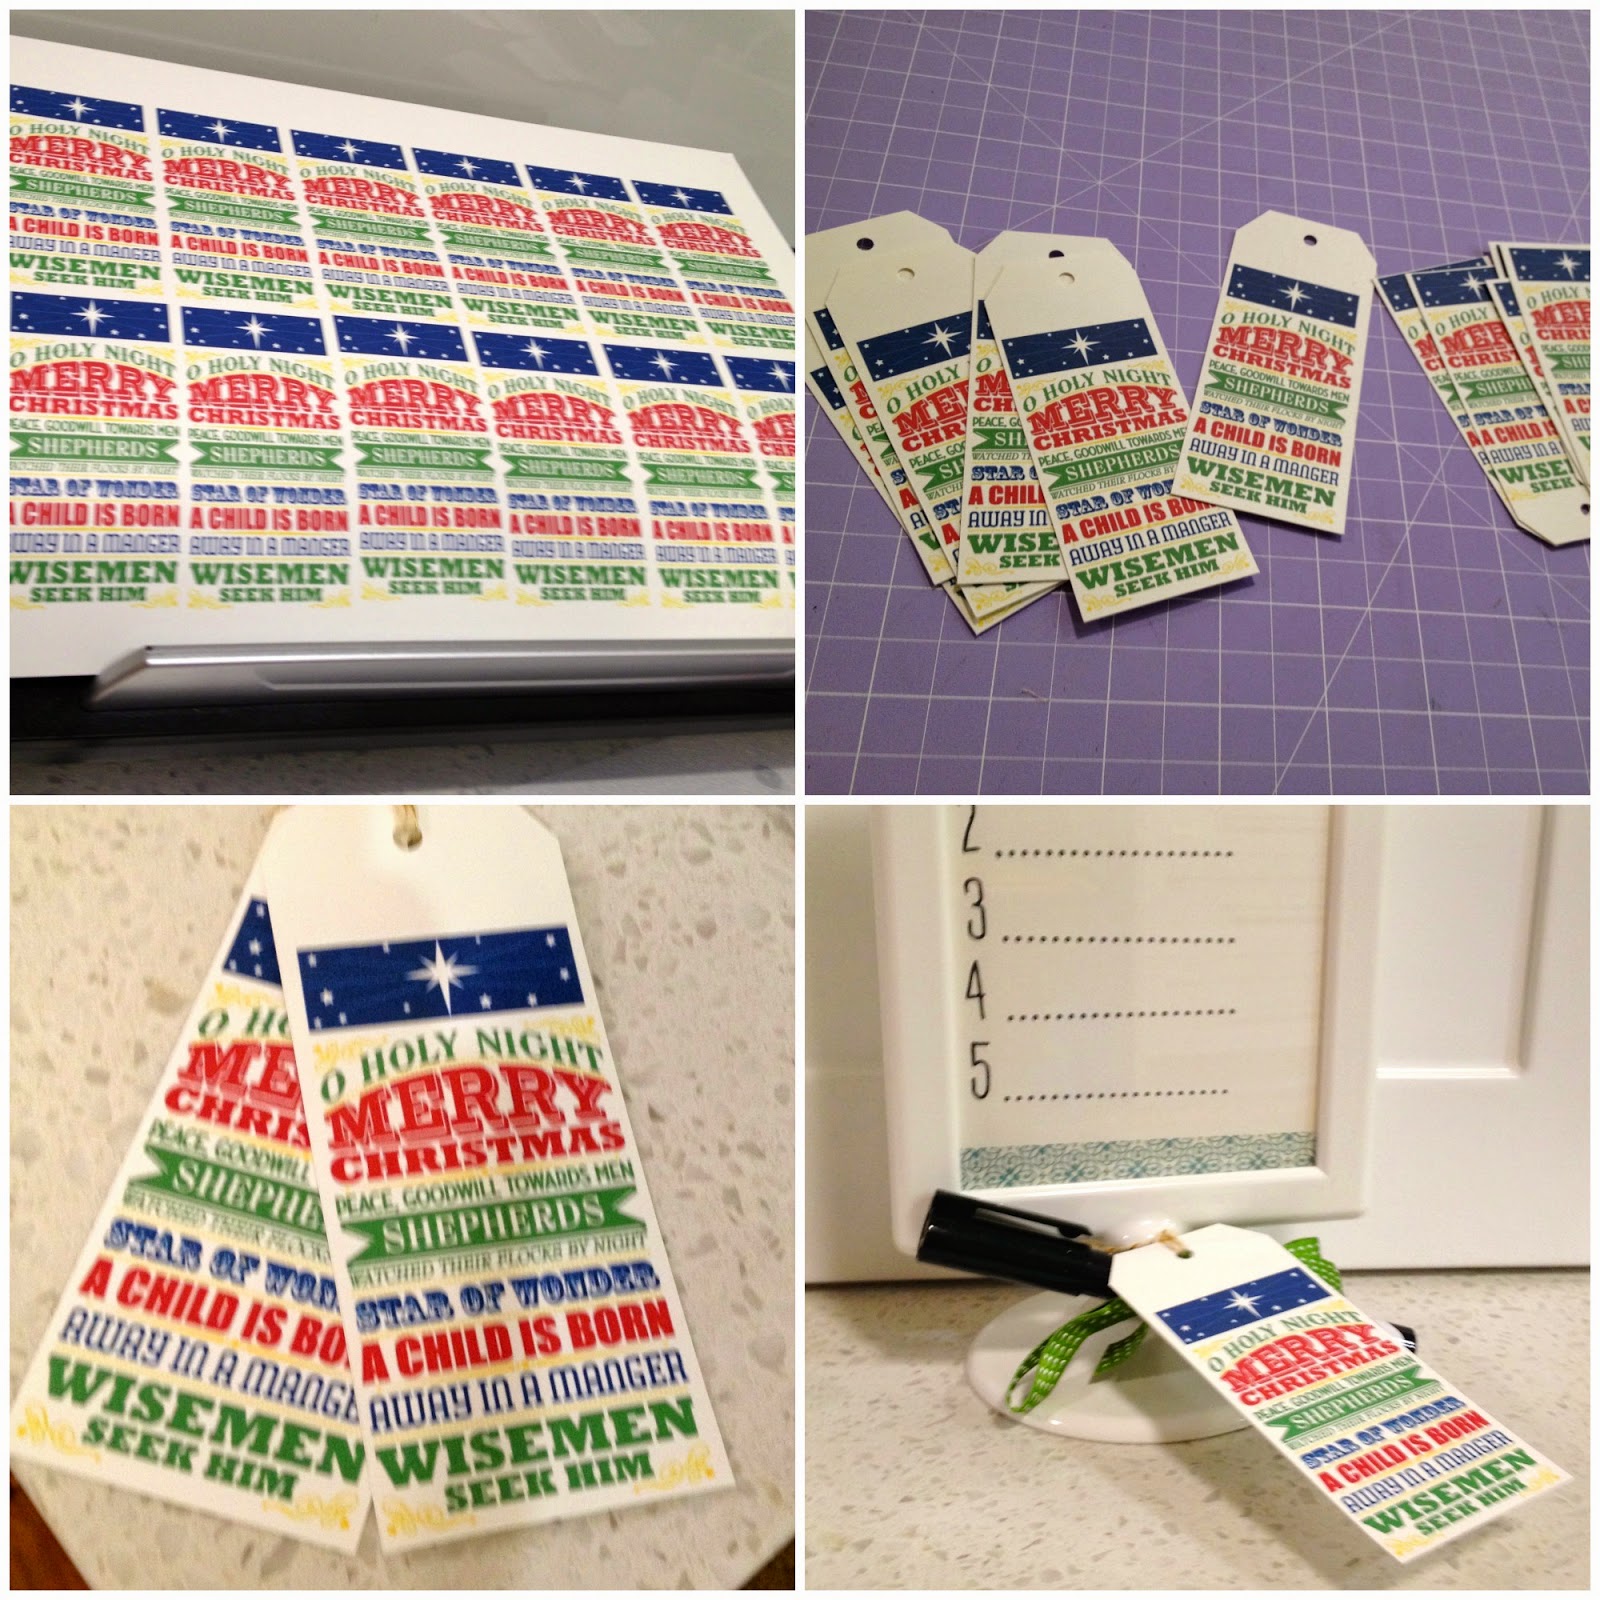
Quick 'n easy tags with My Digital Studio


I love being able to make things on the fly - let's face it, with all the craziness going on at this time of year, I'm never as prepared as I'd like to be.  This is something you can have up your sleeve - you can make them up quickly, or have them all ready to go, depending on your schedule.  
This MDS download is perfect for tags - or for a bit of Christmas Subway Art!  I love it.

All I did was make a blank A4 page for my project, then recoloured the stamp to my liking, sized it to the tag size I preferred, filled the page and printed out a whole page on Whisper White Cardstock on my home printer.  Ta Da!

Then I just used my paper trimmer to cut out the individual tags, and punched the top (or bottom) of the tag with the Angled Tag Topper Punch, put a little Baker's Twine through the hole, and they were done.


If you'd like to make these yourself, click on the links below!
post signature

Sunday, 6 April 2014

Silhouette Framed Art Weekly Challenge


For a change I've made something!  I made this little framed artwork as a present for my niece.  I used a bit of Stampn' Up! DSP (from Sale a Bration); Basic Black cardstock, My Digital Studio  and my Silhouette Cameo.  I used white Silhouette vinyl on the glass of the frame for the cute Dr Seuss quote.

The link to the Silhouette Weekly Challenge is here:  http://blog.silhouetteamerica.com/2014/04/framed-art-weekly-challenge.html

I love the possibilities!  


Monday, 17 March 2014

Top 'O The Morning to You!

Happy St Patrick's Day!

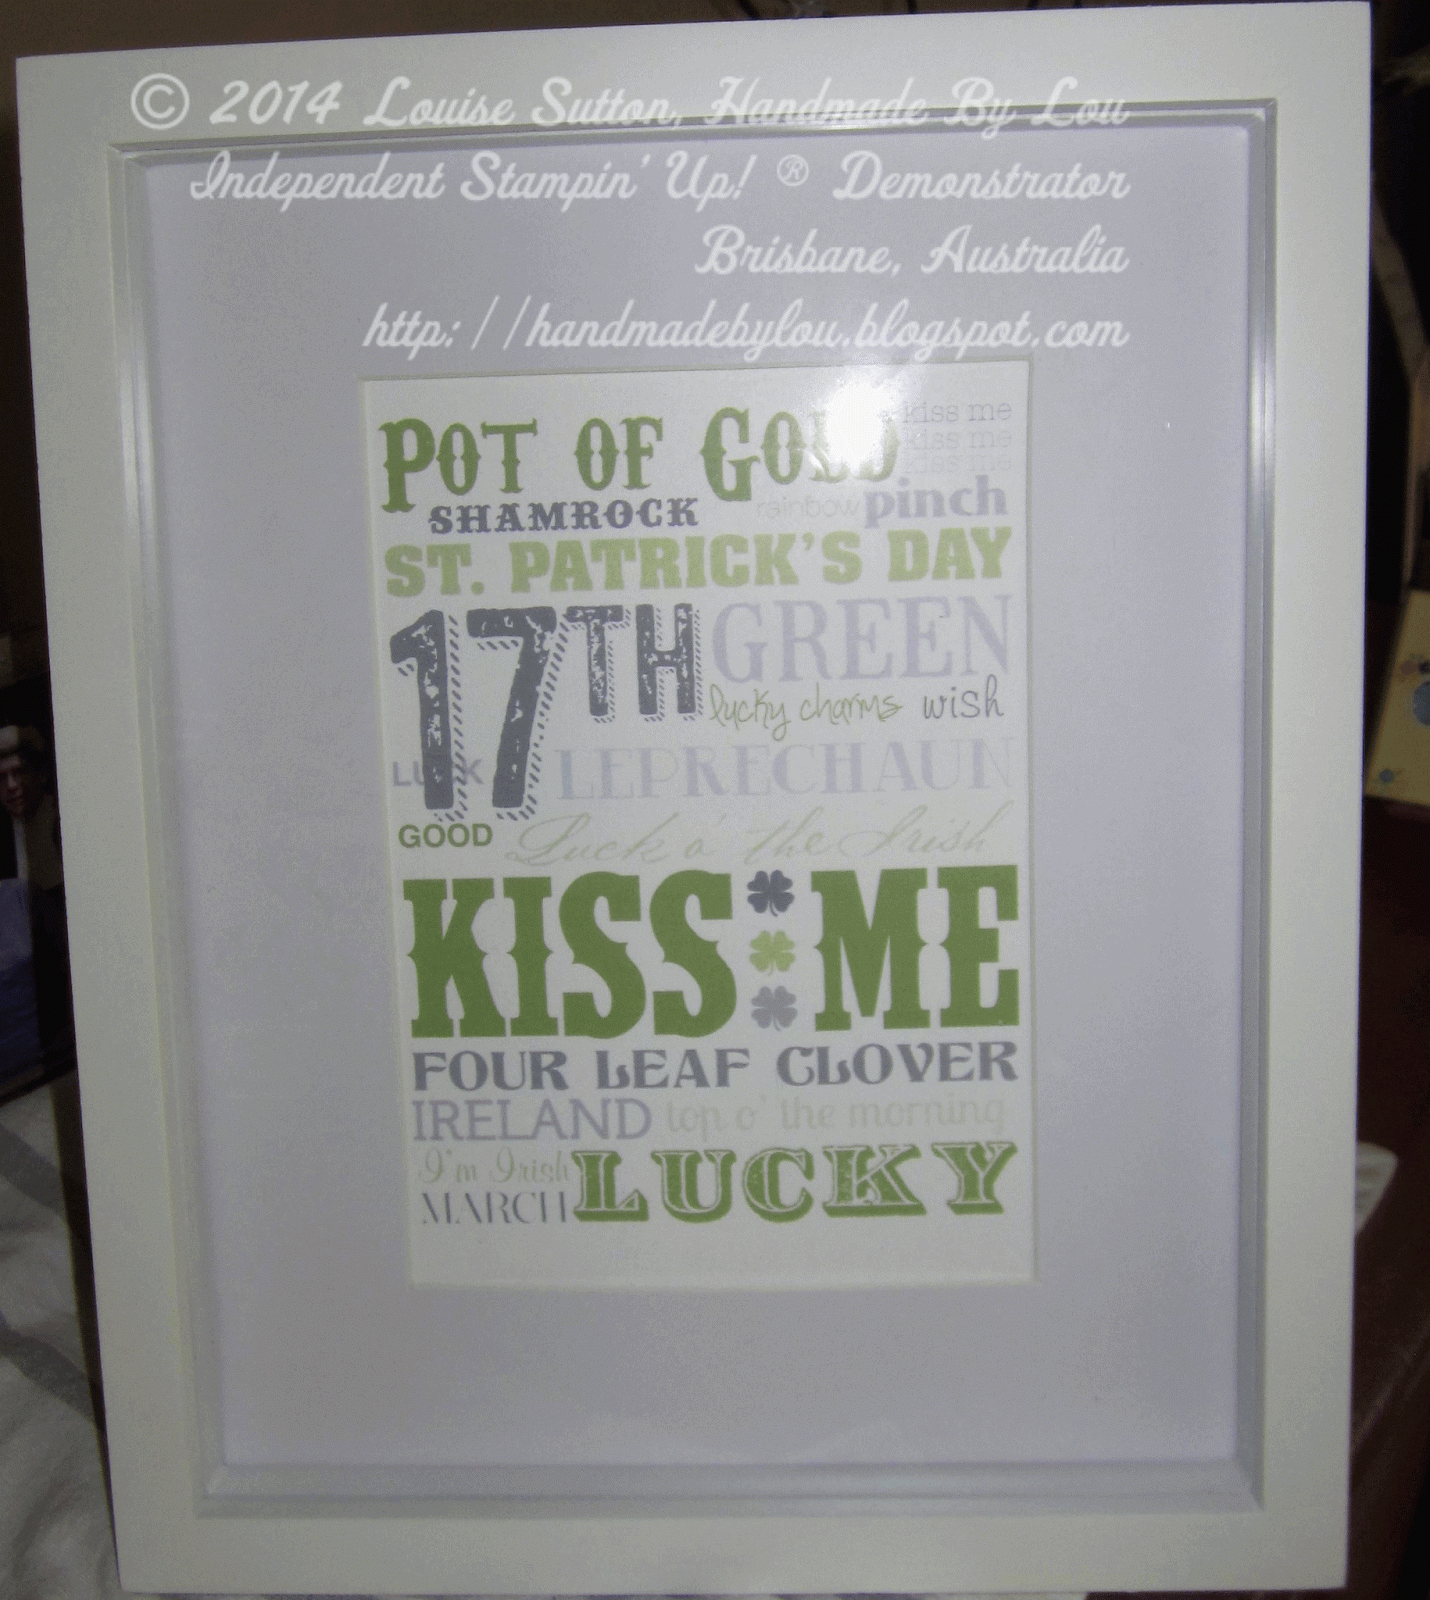
This is the Lucky printable from My Digital Studio - I used the artwork from this to make the badges (the 4 leaf clover and the words)


I have Irish heritage, as does my husband, although we're  4th generation Australian - I ALWAYS make a point of wearing green on St Paddy's Day, and my kids always do too.   In past years, my SU! stash has come in handy - green ribbons, handout green shamrocks pinned to their shirt, etc.

This year, I made easy stickers they could wear to school in My Digital Studio.


I simply designed little badges in MDS on my computer and printed them out on to sticker paper with my printer at home.  Then I was able to cut them out with circle framelits and my Big Shot.


The work of minutes!


Tuesday, 11 March 2014

Digi Download Day


It's Tuesday, so that must mean - NEW Downloads for MDS!


As usual, you can purchase these from my Online Store!

Don't forget to RSVP to my class on Thursday 13th March, as well.  I hope you can make it!


Tuesday, 18 February 2014

Downloads today!


Aren't they cute?  I haven't decided which one to get first!
If you would like to download one of these, head to my Online Store.

Monday, 17 February 2014

MDS Hybrid Bookmarks


A friend of mine is a year 1 teacher, and at the start of each school year, he likes to give his students a little "welcome to my class" gift.  I made his students a bookmark to add to the package of goodies.  

You can make these without an e-cutter, obviously - especially now that we have the Tag Topper Punches I have featured on the blog here recently.  However, at the time I made these, I didn't have the punch yet, and I'd just purchased my Silhouette Cameo - so it just made sense to me to try it out, given I had 27 or so to make.  

I'll show you two ways of making these bookmarks - one with the Cameo and one without.

1.  Without an E-Cutter:

MDS Steps- Go into My Digital Studio, and open up a new document.  Make it the size that works with your home printer - A4 size.  

Of course, you could make your own images and words for your bookmarks, using the stamps and embellishments you already have in MDS (or for that matter you could just stamp on Whisper White Cardstock).  I loved the cute bookmarks in Book Buddies that Stampin' Up! designed in My Digital Studio, so I had to get those.  


If you'd like to get it as well, you can get it HERE


Once you've opened your new file, find the bookmarks.  They will be separated into background panels, images, and the words.


Then, layer them as you wish like this:


Make sure you use the "group" function when you have all your elements the way you want them, so you can move your bookmarks around without losing bits.

If you like, you can save this project as a .JPEG now, and print it out, and cut it out.  I like to even my bookmarks up first, to make it easier to cut them out.


To make them all straight, use the "Align" tool.  There, isn't that better?


Now, you can print it out, and cut out the bookmarks !

2.  With a Silhouette Cameo:

I'm sure the steps are similar with other e-cutters, but I have a Silhouette Cameo, so that's what I know.

First, I cut out a 12 x 12 Crumb Cake page of bookmarks:


I'm pretty sure the bookmark was one of the free shapes that came with my Silhouette or one of the kits. You could easily just make rectangles of course. 
I was able to fit 7 bookmarks to a 12 x 12 inch page. I saved the full page as a cut file so I can use it again and again.


Here they are, ready to decorate!  Usually I like to sponge the edges with Crumb Cake ink, but I didn't bother for these bookmarks.

Now for the Book Buddies images.  Don't bother creating your image in MDS and exporting as an SVG file - because only the parts of the image (3 digital stamps) will be exported.  This won't be the case with some other stamp sets.

I imported all the elements (.PNG and .SVG) into my Silhouette library.  I have the Designer Studio Edition, specifically for this purpose.


I've gone ahead and imported most of the .SVG files in MDS into my Silhouette library already, but you can also import .JPEG and .PNG files.

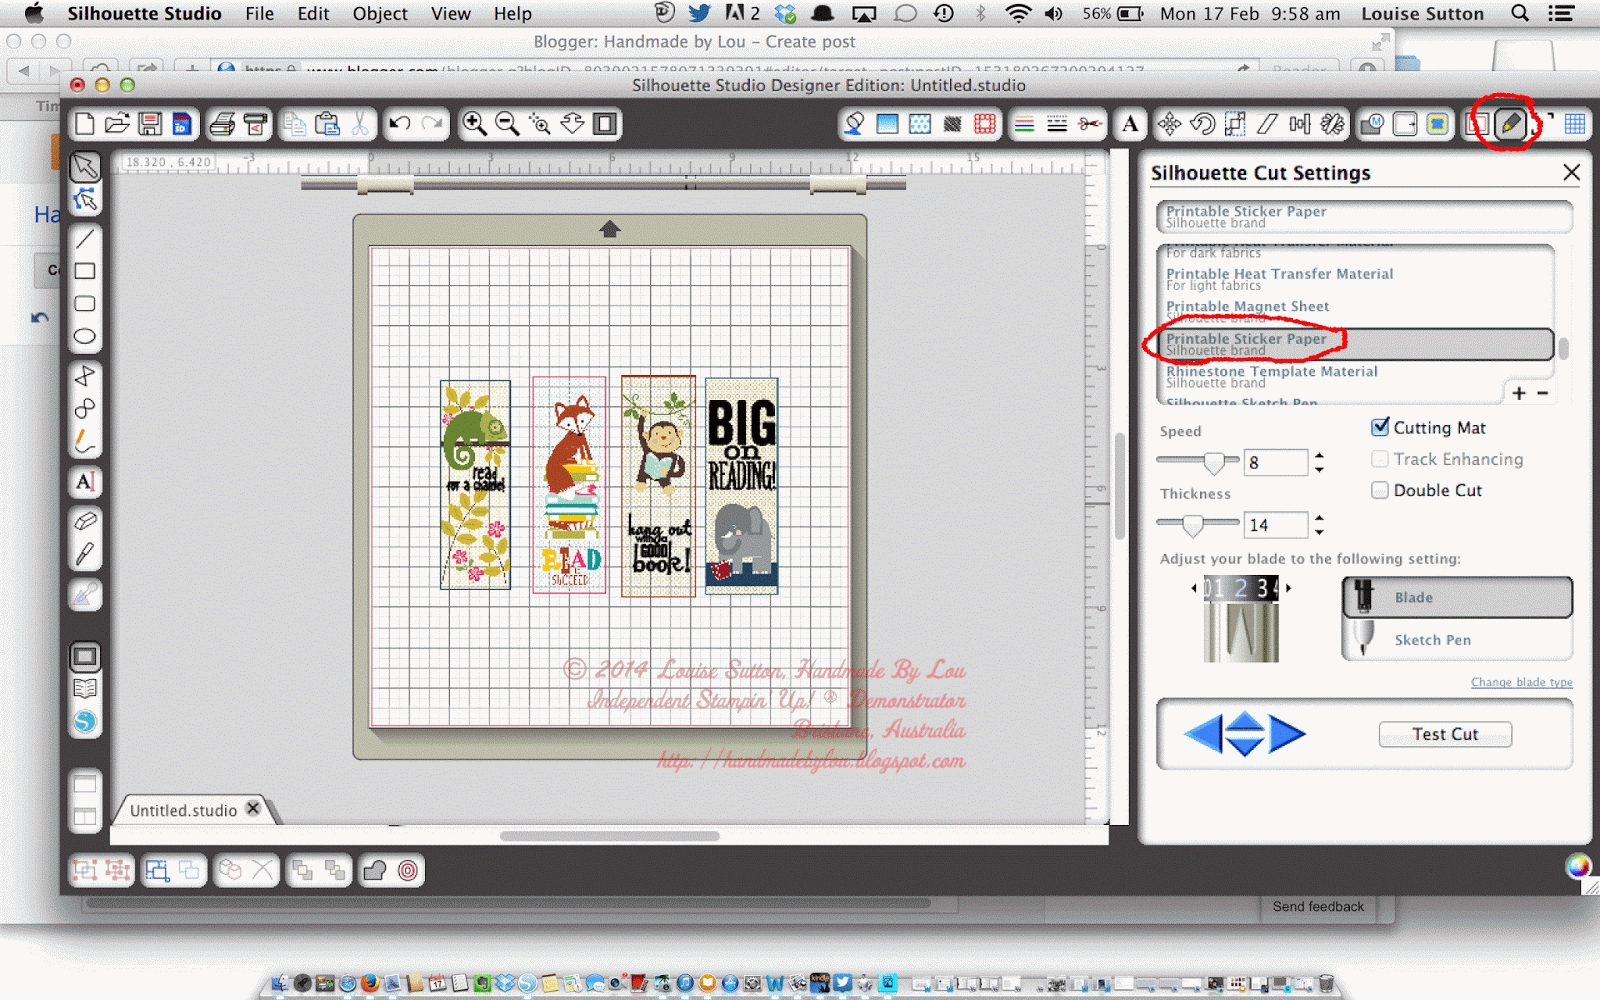
Here's what it looks like in my Silhouette library:


As you can see, I've already assembled and saved my bookmarks as a printable in my library.  Why reinvent the wheel each time?

Once you've assembled (and grouped) your Book Buddies the way you want them, you'll want to send them to your printer to utilise the "Print and Cut" feature.  I love this.

First, make sure you select "Registration Marks" because this is how the clever Silhouette will know where the images you printed are on the page.

Then, send it to your printer for printing!
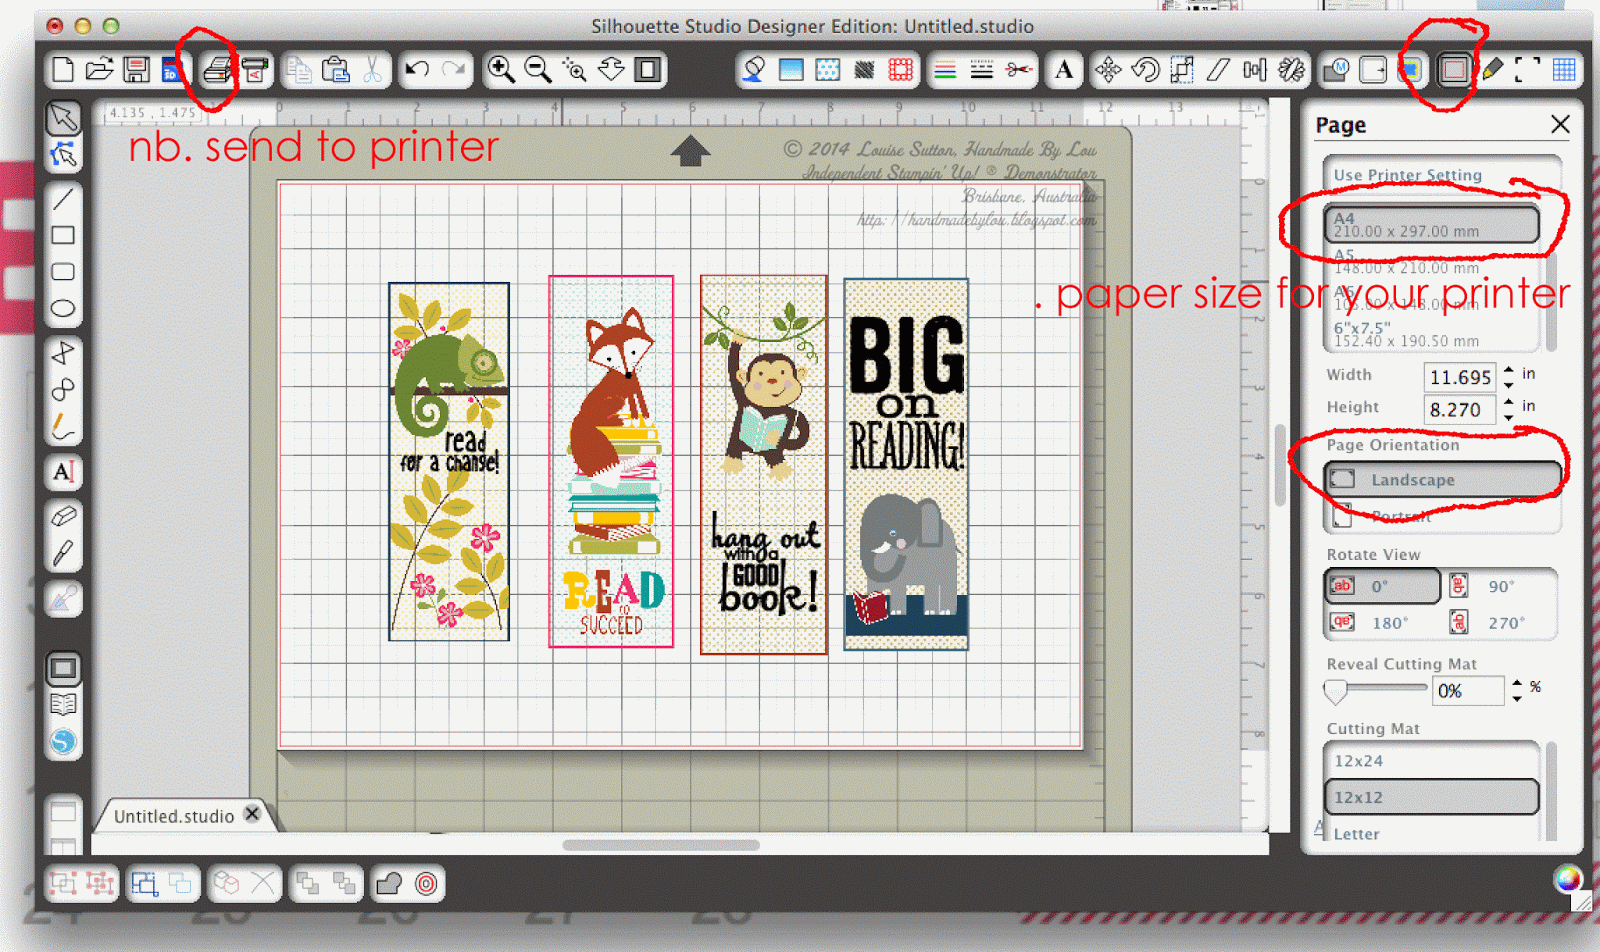
Oops, forgot to show the registration marks on this screen!  They should be there as in the previous picture.
 When you've printed out your bookmarks, they will look like this:


I printed mine on adhesive label paper (Silhouette has their own brand, but I didn't have any of it.  I used some I found at Officeworks instead.) but of course I could have used Whisper White card stock and my snail adhesive.

In order for your Silhouette to cut the right lines (in this case, the outside of the Book Buddies panels) you need to tell it what to cut out.  To do this, I used the "Trace" feature, as follows:
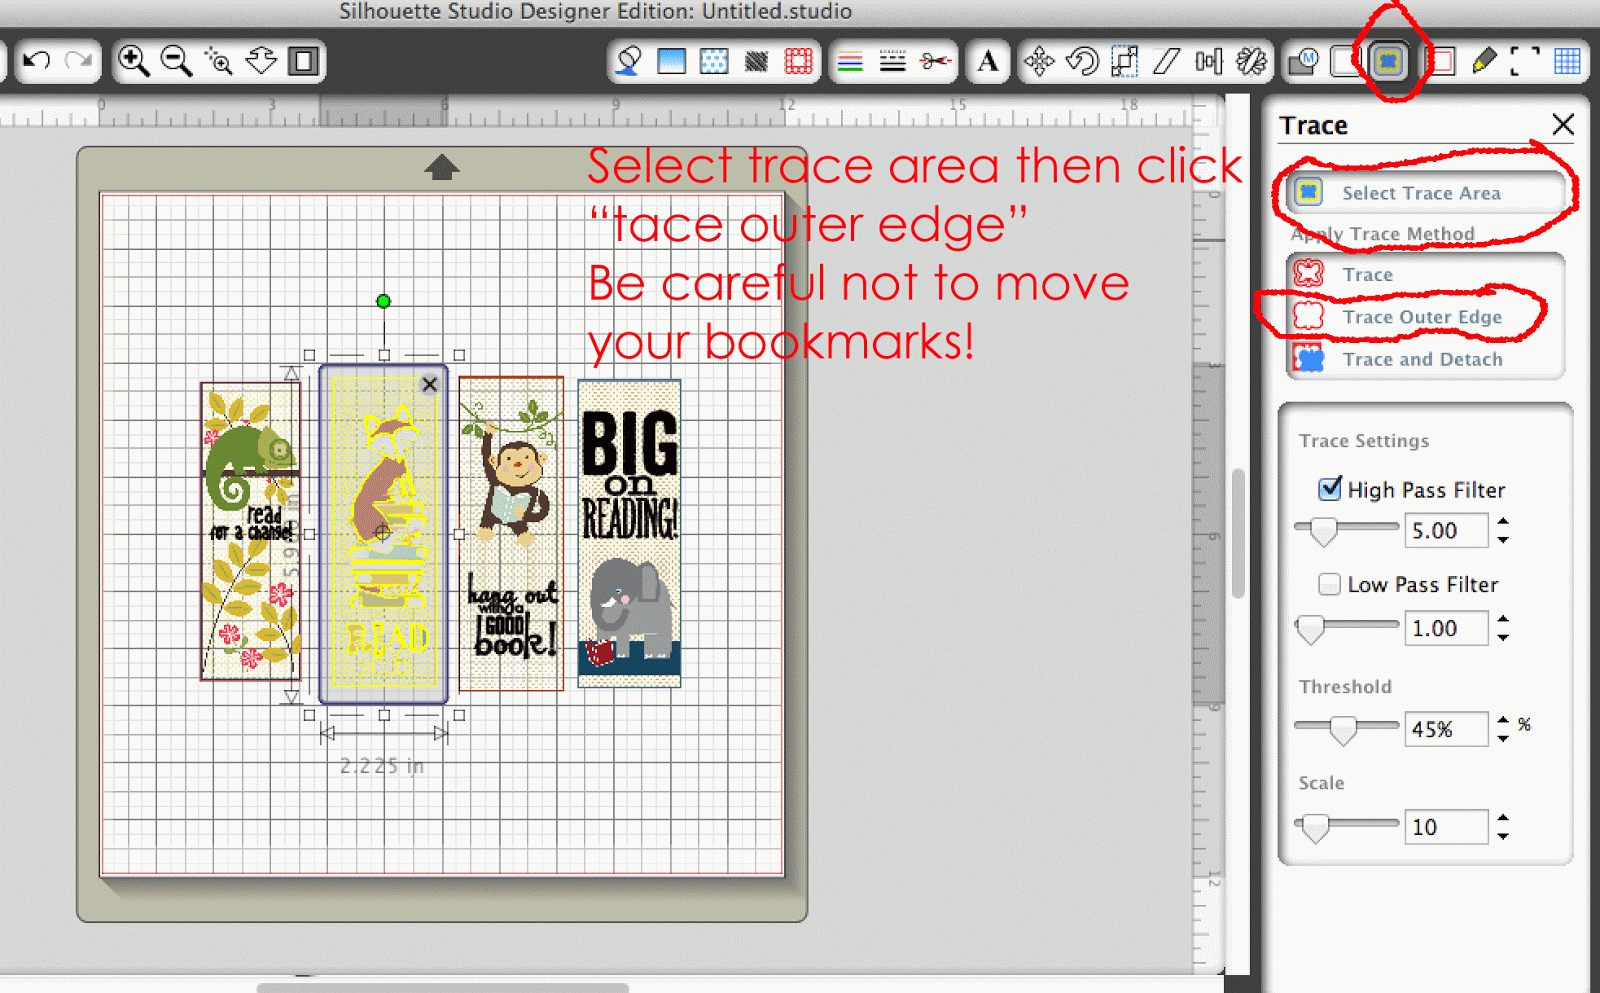
Ugh, "TRACE"  not "tace!"  

Load your printed bookmarks back into your Silhouette, making sure the little black square is lined up with the blade (that's how it will "read" the registration marks) and make sure your cut settings are appropriate for your material.  For example, the sticker paper I used is thinner than the Silhouette brand sticker paper, so I had to tweak the settings and experiment a little to get it to cut perfectly.  I found a blade setting of 1 was just fine.  

Then press cut or "send to Silhouette" and let it do the work.


Adhere your printed images onto the bookmarks, decorate with ribbon or twine, and you are done.


I hope this was helpful to anyone using MDS with their Silhouette Cameo.  Let me know if you have any questions, and I'll try my best to answer them.  

What do you think of my Blog and Facebook Page makeover?  I made it in MDS in a few minutes.  I needed to freshen things up a little!


Tuesday, 10 December 2013

MDS - Makes life easy

I'm so glad I have My Digital Studio when it comes to this crazy time of year.  Last week, I helped create a beautiful and meaningful Teacher Gift, which I was able to print at home onto Whisper White card stock and frame.  The work of minutes!

All I did was open an A4 document in My Digital Studio, and used MDS alphabet stamps for the title, then I opened a text box for each name or word and rotated some of them until I was happy with the look.  I was able to use the different fonts installed on my computer (I have lots - some of them are from free sites like dafont.com) for each child's name.


This "Subway Art" was made with the names of the children in the class, in bright colours and different fonts.  

This piece was made using words collected from the children to describe  their lovely teacher.
What do you think?  If I'd had more time, I might have sent them off to be printed professionally, but they actually worked out very well on my home printer.  Thank goodness!


Sunday, 15 September 2013

MDS Monday - Lost Boy


I decided to do a digital scrapbook page with a photo book template in MDS to document a fairly horrible experience - we left my youngest child behind at a Rugby breakup day accidentally.  It had been a busy day, and we took two cars, and we both thought the other had him.  It all ended happily, with my son safe and sound, and he displayed common sense and maturity in the circumstances.  But it was a very frightening experience for all of us, and one that I doubt we'll need a scrapbook to remember.  Nevertheless, I wanted to document this day for the sake of posterity - this will become one of the family stories that will be re-told over the years, and I also like to keep it real.  Not everything in the scrapbook has to be about the good times. 

To make this I used a page layout I liked from the 12 x 12 Designer Kit Family Album.  I'm intending to do many more from this album as I collate the year's events.  I am doing it page by page, but at the end of the year I should have enough done to print off as a Photo book.  I kept it pretty simple, just changing the title of the page and adding my journalling.  I wanted to get the story down, while it was fresh.


I often change up the templates in the Designer kits to personalise them, but it is also fine to use them as they are.  If it ain't broke.....you know.  Sometimes the inspiration strikes, other times you just need to get it done.  

Ugh, I still feel shaky about  what "might have" happened to my brave little boy during the 20 minutes or so we didn't know he was missing.  I'm not sure I'll want him out of my sight to go to school today!


Monday, 2 September 2013

New Baby love! MDS Monday is back!
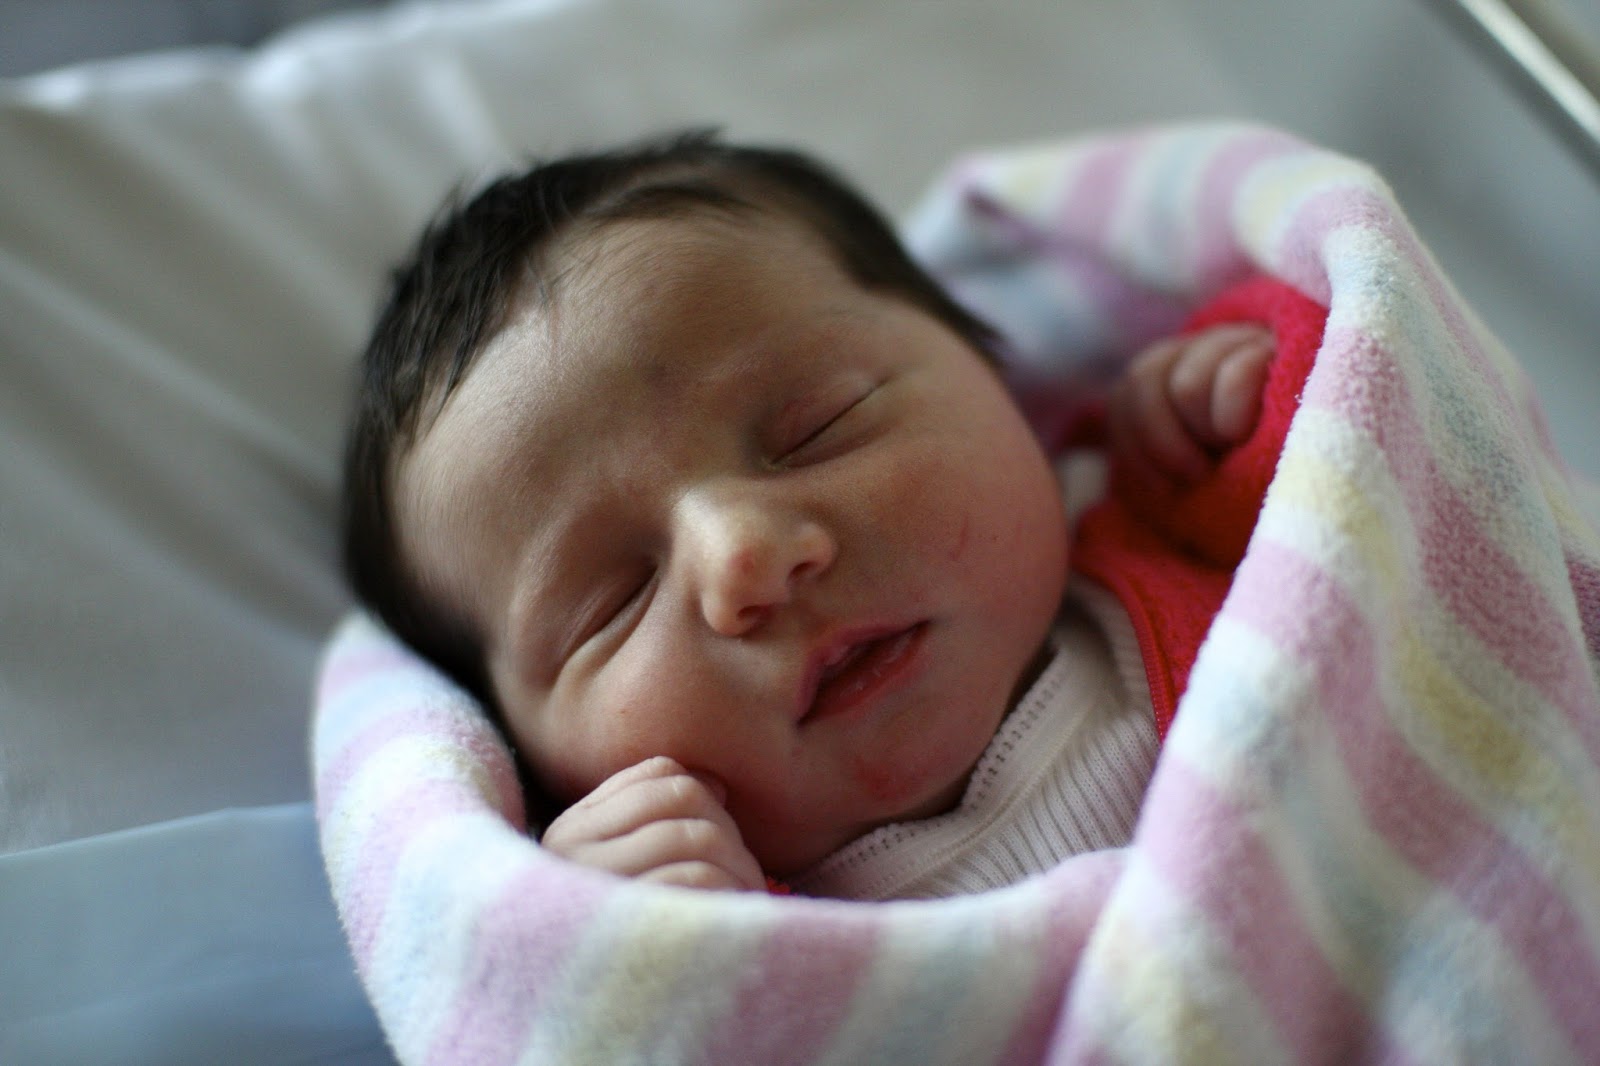
New babies are just delicious, aren't they?  My beautiful sister Jane had a divine baby girl just over a week ago - little Lucy.

Hello sweetie!

 I don't know if my sister will be sending out birth announcements, but I couldn't resist knocking some up with the ready-made templates in My Digital Studio.  Which do you prefer?

So easy to just pop in all the details and a cute photo - then save as a .jpeg and upload to the printer of your choice.  Done.


Did you know you can change the photo into black & white in MDS if you think it suits your project better?  Sweet!


 I must say I love the trendy chalkboard look at the moment, so that's probably my favorite. 

This is what I used:

Hello World Digital Kit - not only announcements, but an entire Baby Shower from cupcake toppers to thank you notes in this kit - and you can easily customize it for any occasion.


You can purchase them as digital downloads from my online store, naturally!  Louise's awesome online store


Getting closer....

It's nearly that time of year, where the retirement list comes out.  That means the in-colours we've loved the past 2 years are leav...