Showing posts with label heat embossing. Show all posts

Sunday, 5 December 2010

Heat Embossing Tutorial - now with pictures!

Heat Embossing Tutorial


Stamps:  Four The Holidays, Delightful Decorations, Season of Joy
Ink:  Versamark, Night of Navy, Real Red
Paper:  Confetti Cream, Confetti White, Real Red, Night of Navy, Ballet Blue (retired)
Other:  Movers and Shapers Die, Big Shot, Dimensionals, Silver Embossing Powder, Heat Tool


Nothing says "Christmas" like some lovely gold or silver embossing, am I right?  In case you are new to stamping, or have been wondering how to do it, here is an illustrated tutorial for your edification and enjoyment!


You will need:
Embossing Buddy (103083 $9.50)
Powder Pal or scrap cardstock  (Powder Pal 102197 $37.95)
Versamark (102283 $13.95)
Embossing powder (Silver 109131 $8.95)
Heat Tool (106586 $49.95) 
Small Paint Brush
Stamps and Paper, naturally!

Step one:
Swipe your cardstock with the Embossing Buddy - this will minimise, if not eliminate stray embossing powder going where you don't want it to.  Your fingers leave small traces of oil etc on the cardstock, which attracts the embossing powder.  So believe me, it DOES make a difference.
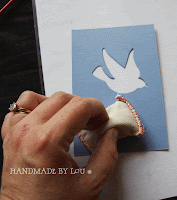
The Embossing Buddy IS your friend!

Step two:
Ink up your stamp in Versamark and stamp your image.  Versamark is a clear "sticky" ink which can be used alone to create a gorgeous watermark effect, or for heat embossing as we are about to see, due to its slow drying nature.  Normal Classic dye ink is totally unsuitable here as it will dry almost instantly.
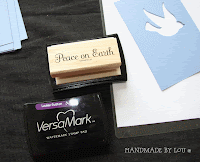

See the watermark impression?
Step three:  
Sprinkle embossing powder of your choice over the Versamark.   Now you see why you need the scrap cardstock or Powder Pal - you tap the excess powder back into the container (this can be messy).  Use the paintbrush for any stray bits of powder that are stuck in the wrong spot.

I tend to keep all my most used embossing poders and glitters into these handy Glad containers, as they are easier on the clean up than the little pots they come in.


Make sure you have no stray specks of powder before you melt it!

Step four:
Melt the powder with a heat gun.  Yes, you CAN use a toaster; but I don't recommend it as people have burned down their kitchens that way!  Do NOT try to use a hairdrier instead - it isn't hot enough and will just blow the powder off.  I've also heard of people trying to use an industrial heat gun - it is too hot and will scorch the paper.  Use a craft heat gun, people, please.  This is not the type of thing you want to mess with.


Keep the heat gun on the powder until you see it change - looks magical!  Don't overheat it, or the image will look flat instead of raised.  You can also scorch the paper if you hold it too close or for too long.  This is something you need to practice, as your heat gun might be slightly hotter than mine, for example.

Again, Glad to the rescure!  I find a tray helps me  not burn my fingers and reflects the heat, speeding up the process.


Step five:
Once you have melted the powder - admire your work.  Impressive, no?


Stampin' Up!  sells all of the products listed above.  Just in case you wondered.  And you can purchase them from me, just drop me an email.


Now go out there and heat emboss with confidence!

Monday, 29 November 2010

Heat Embossing Tutorial

Nothing says "Christmas" like some lovely gold or silver embossing, am I right?  In case you are new to stamping, or have been wondering how to do it, here is an illustrated* tutorial for your edification and enjoyment!

You will need:
Embossing Buddy
Powder Pal or scrap cardstock
Versamark
Embossing powder
Heat Gun
Small Paint Brush
Stamps and Paper, naturally!

Step one:

Swipe your cardstock with the Embossing Buddy - this will minimise, if not eliminate stray embossing powder going where you don't want it to.  Your fingers leave small traces of oil etc on the cardstock, which attracts the embossing powder.  So believe me, it DOES make a difference.


Step two:

Ink up your stamp in Versamark and stamp your image.  Versamark is a clear "sticky" ink which can be used alone to create a gorgeous watermark effect, or for heat embossing as we are about to see, due to its slow drying nature.  Normal Classic dye ink is totally unsuitable here as it will dry almost instantly.


Step three:

Sprinkle embossing powder of your choice over the Versamark.   Now you see why you need the scrap cardstock or Powder Pal - you tap the excess powder back into the container (this can be messy).  Use the paintbrush for any stray bits of powder that are stuck in the wrong spot.


Step four:

Melt the powder with a heat gun.  Yes, you CAN use a toaster; but I don't recommend it as people have burned down their kitchens that way!  Do NOT try to use a hairdrier instead - it isn't hot enough and will just blow the powder off.  I've also heard of people trying to use an industrial heat gun - it is too hot and will scorch the paper.  Use a craft heat gun, people, please.  This is not the type of thing you want to mess with.

Keep the heat gun on the powder until you see it change - looks magical!  Don't overheat it, or the image will look flat instead of raised.  You can also scorch the paper if you hold it too close or for too long.  This is something you need to practice, as your heat gun might be slightly hotter than mine, for example.


Step five:

Once you have melted the powder - admire your work.  Impressive, no?

Stampin' up!  sells all of the products listed above.  Just in case you wondered.

*my computer is too slow to load my pictures as someone (looking at my husband with intense glare) has exceeded our monthly downloads.  I'll have to edit and post the pictures on the 1st December.  Sigh.

Tuesday, 25 November 2008

Heat 'n Stick tutorial (or how to make the sparkly tree)


Due to popular demand (well, Christine and Maree wanted to know, anyway!) I've made a step by step tutorial on how to use Heat 'n Stick powder.        

Here is what you will need:
  • Heat Gun
  • Versamark
  • Ink colour of your choice
  • Dazzling Diamonds Glitter
  • Heat n Stick Powder
  • small paint brush
  • Powder Pal
  • Embossing Buddy
  • Cardstock
  • Stamp


Step One:
Give your cardstock and the powder pal (scrap cardstock may be substituted if you don't have a powder pal) a vigourous rub over with the embossing buddy.  Don't worry if you see little bits of powder from the embossing buddy on your cardstock; they will easily brush away at the end.  This will help stop any stray bits of embossing powder (if you were embossing) or heat n stick powder from sticking to the places you don't want them to go.


Step Two:  
Ink up your stamp with Versamark.  Versamark is a clear "sticky" ink that can be used alone to create a lovely watermark effect (tone on tone) or can be used to heat emboss with coloured dye inks or coloured embossing powder.  It is a must-have in any stamper's arsenal of supplies, in my opinion

.

Step Three
Next ink your stamp into your dye ink of choice (here I've used Wild Wasabi):


And here's what it should look like:


Step Four: 
Next, working quickly while the ink is still wet, pour some Heat n Stick Powder over your image.  Tap off any excess and return it to the jar (it can be used many times over).  Here's where the Powder Pal comes in handy (and now you see why I rubbed it over with the embossing buddy:  static cling makes the fine powder stick even to the powder pal).

Step Five
Now heat up the image with your heat gun until you see the powder go shiny:


Step Six
While the image is sticky, dump on your glitter, and tap off any excess:

I store my glitter (and the embossing powders I use most) in these handy Glad containers,  much easier for clean up.

Step Seven
Then give it a quick (and I mean only for a couple of seconds) blast with your heat gun again to set.  It is frustratingly easy to burn your image if you overheat it - so you might need to do a few practice runs with this.


Step Eight
Allow image to cool, then using a paintbrush, or in my case, an old makeup brush, remove any stray glitter from your image.
  

And voila!  Your lovely, glittery tree is ready to be added to your project.  Click on the image to see more detail.  The other great thing about this technique (apart from the bling!) is that because the glitter is "set" with the heat gun, it won't rub off your project.

Sunday, 23 November 2008

Bad blogger!

OK, I know its been a little while since my last post - lots of busy life stuff, plus bad storm activity here has meant no time to post.  I haven't been idle however!

Here are the cards we were supposed to be making at our Christmas Card Class last week - unfortunately, it was cancelled due to hail.  Hopefully Mother Nature will be in a better mood this week.  


The card on the left uses a technique known as "reverse masking" which is very easy, but looks effective.  The card on the right uses heat embossing - I know many of my "card ladies" have been keen to try this technique!  I've used stamps from Crazy for Christmas, Short & Sweet, Lovely As A Tree, and Occasional Greetings (just to make a change from Season of Joy!).


I'm also working on a 8 x8 scrapbook for both sets of grandparents for Christmas (Shh! don't tell!) and finally added another couple of pages today.  I've used Ahoy Matey, and Matey's Map (jumbo wheel) to make my cute little pirate baby page.  So quick!  I'm all about quick these days, LOL.


Finally, I've made a scrapbook page of my daughter using the Round Up Simply Scrappin' Kit.  I was amazed at how easy it was to put this together.  I also made the medallion embellishment using a stamp from the Wanted stamp set - it matched up perfectly with the scallop circle punch!  Ahhhh, I LOVE it when things work together like that!

Just a quick reminder - we are now in the last days of the Spring Mini Catalogue, and the November promos (rub ons and single markers) so you'd best order ASAP or you will miss out!


Thursday, 30 October 2008

Some girly cards and my son's Halloween card!

Hello!
I'm feeling in a girly mood, and I had some pretty DSP (designer series paper) lying around, so I've experimented with some "girly" cards:  the first two have almost no stamping at all!


Hmm.  Not sure why this ended up sideways.  

This little bird was embossed with my SU dye ink  by inking up my stamp in Versamark watermark ink (clear ink used in embossing) and then dipping the stamp into my Groovy Guava dye ink pad.  I then sprinkled clear embossing powder onto the image, and melted it with my heat gun.  Voila!
Here we have the bird again, but this time she's very sparkly!  The photo does not do it justice - glitter never photographs well.  I deliberately made one edge of the card shorter than the other and stuck in some co-ordinating DSP along the edge for fun.

My little butterfly was also glittered up using the same technique as the bird - stamped in Versamark, then pixie pink ink, then onto the whisper white cardstock.  I then sprinkled on Heat'n Stick powder, melted it until it was sticky, and sprinkled over Dazzling Diamonds glitter, and gave it a quick final blast with the heat gun to set it.   Can you get any girlier than a pink, glittery butterfly?  

Finally, here's the card my 6 year old son made with me earlier this month to send to his best friend for Halloween.  Didn't he do a great job?  I drew the tree and skull, he did the rest.

Tuesday, 7 October 2008

Some wedding cards


This past weekend, a former work colleague of mine, was married - and it reminded me of my own wedding nine years ago on the first Saturday in October. Beautiful weather, a gorgeous dress and a wonderful day. My Mother in law also needed a wedding card, so I decided to duplicate my card in a different colour. I'm quite pleased with the result. The vellum reminded me of a wedding veil.

I first stamped the background stamp (En Francais by Stampin' Up!) on the Lavender card with Lavender ink and sponged around the edges, then heat-embossed the vellum layer in white with the swirl from the Baroque Motifs stamp set (also SU!) and attached it with adhesive and brads. A bit of celery ribbon to match the celery base card, and the sentiment and it was done. The apricot card was done the same way, but obviously used different colours - Blush Blossom card stock stamped with Apricot ink this time. I really love that colour combination! The beauty of these cards is that they were actually really simple and quick to make. Deciding which colours to use took longer than the time it took to make them!

I rarely get to make wedding cards, so I enjoyed the change from birthday and Christmas cards!

Thanks for looking.


Saturday, 4 October 2008

Making a start on Christmas


This year, I am determined to be organised for Christmas. This year, I am not juggling a new baby, working three days a week as a lawyer, as well as the usual Mum stuff. THIS is the year I will be organised! Hmmmmm, let's see how that works out, shall we?

At least I've made a start on Christmas cards. Note: a start. Not finished or anything.

Here are a few of my cards so far:

I've used Stampin'Up! cardstock, and their Season of Joy stamps for the top four cards, and Stamp-It Australia's awesome unmounted rubber stamps for the last card there. I embossed that card with gold - easy way to achieve a "Christmassy" look, I think. (Is "Christmassy" a real word? It is now!)

Oooh, and I've discovered a great site that makes free watermarks for your photos: PicMarkr (one day I'll figure out how to make a hyperlink. Yes, I am a Luddite. ) Super-easy and quick.

Hmmm, I've managed to make this page all weird. Looks like I have a few kinks to iron out!

Better go, as a small boy has woken from his nap.

Oh, and Happy World Cardmaking Day!


Getting closer....

It's nearly that time of year, where the retirement list comes out.  That means the in-colours we've loved the past 2 years are leav...