A friend of mine is a year 1 teacher, and at the start of each school year, he likes to give his students a little "welcome to my class" gift. I made his students a bookmark to add to the package of goodies.
You can make these without an e-cutter, obviously - especially now that we have the Tag Topper Punches I have featured on the blog here recently. However, at the time I made these, I didn't have the punch yet, and I'd just purchased my Silhouette Cameo - so it just made sense to me to try it out, given I had 27 or so to make.
I'll show you two ways of making these bookmarks - one with the Cameo and one without.
1. Without an E-Cutter:
MDS Steps- Go into My Digital Studio, and open up a new document. Make it the size that works with your home printer - A4 size.
Of course, you could make your own images and words for your bookmarks, using the stamps and embellishments you already have in MDS (or for that matter you could just stamp on Whisper White Cardstock). I loved the cute bookmarks in Book Buddies that Stampin' Up! designed in My Digital Studio, so I had to get those.
If you'd like to get it as well, you can get it
HERE
Once you've opened your new file, find the bookmarks. They will be separated into background panels, images, and the words.
Then, layer them as you wish like this:
Make sure you use the "group" function when you have all your elements the way you want them, so you can move your bookmarks around without losing bits.
If you like, you can save this project as a .JPEG now, and print it out, and cut it out. I like to even my bookmarks up first, to make it easier to cut them out.
To make them all straight, use the "Align" tool. There, isn't that better?
Now, you can print it out, and cut out the bookmarks !
2. With a Silhouette Cameo:
I'm sure the steps are similar with other e-cutters, but I have a Silhouette Cameo, so that's what I know.
First, I cut out a 12 x 12 Crumb Cake page of bookmarks:
I'm pretty sure the bookmark was one of the free shapes that came with my Silhouette or one of the kits. You could easily just make rectangles of course.
I was able to fit 7 bookmarks to a 12 x 12 inch page. I saved the full page as a cut file so I can use it again and again.
Here they are, ready to decorate! Usually I like to sponge the edges with Crumb Cake ink, but I didn't bother for these bookmarks.
Now for the Book Buddies images. Don't bother creating your image in MDS and exporting as an SVG file - because only the parts of the image (3 digital stamps) will be exported. This won't be the case with some other stamp sets.
I imported all the elements (.PNG and .SVG) into my Silhouette library. I have the Designer Studio Edition, specifically for this purpose.
I've gone ahead and imported most of the .SVG files in MDS into my Silhouette library already, but you can also import .JPEG and .PNG files.
Here's what it looks like in my Silhouette library:
As you can see, I've already assembled and saved my bookmarks as a printable in my library. Why reinvent the wheel each time?
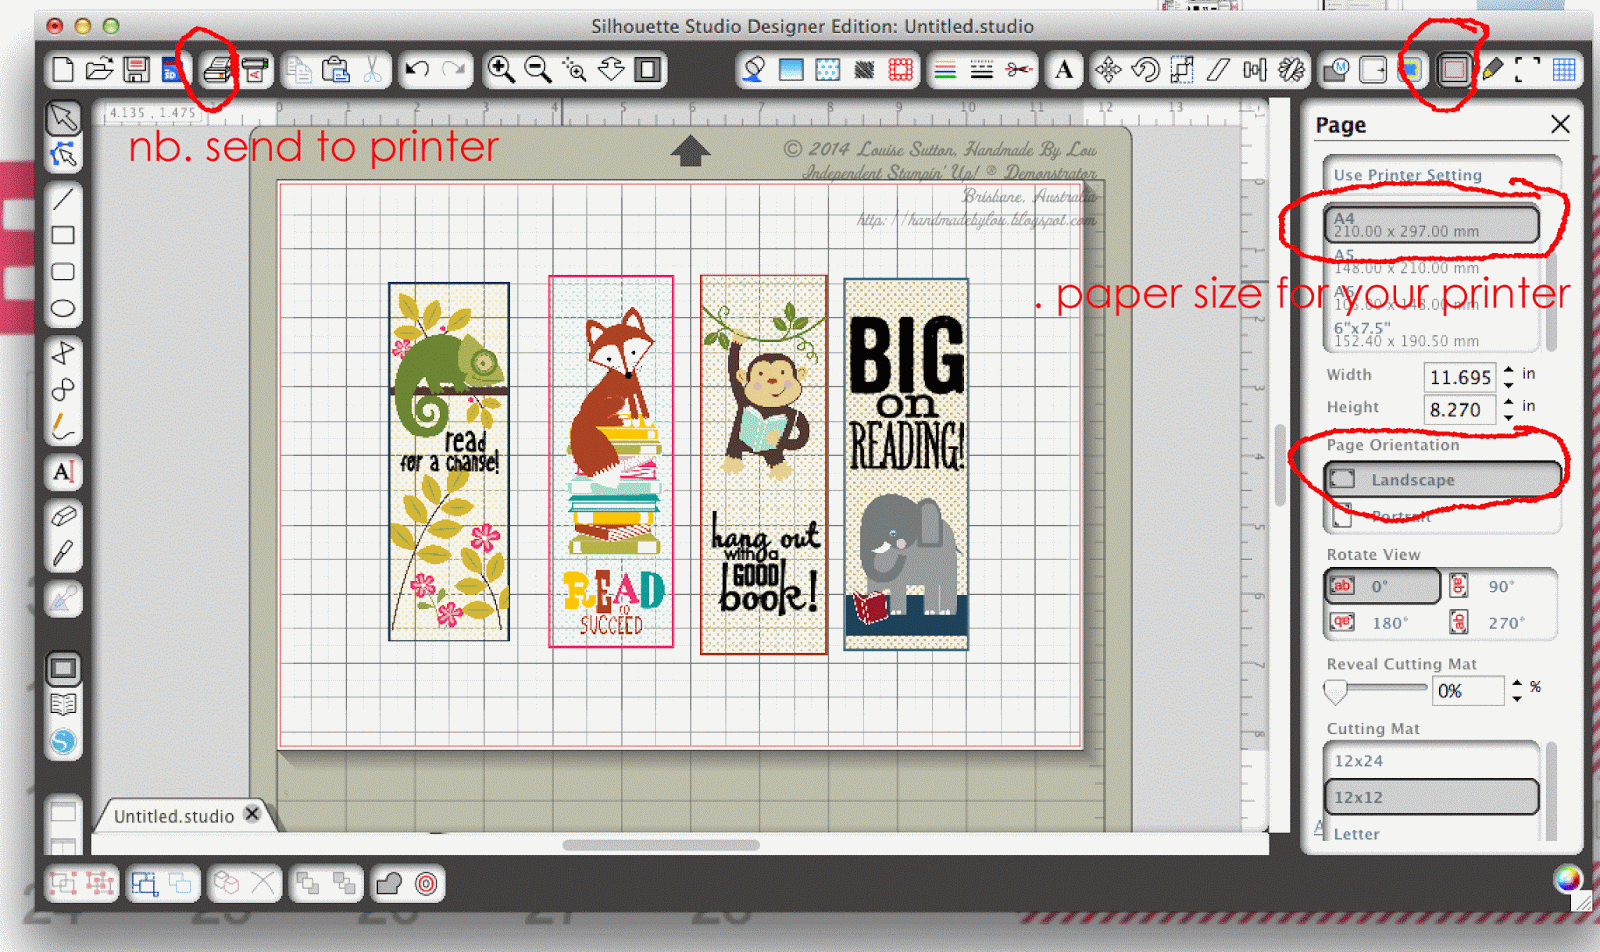
Once you've assembled (and grouped) your Book Buddies the way you want them, you'll want to send them to your printer to utilise the "Print and Cut" feature. I love this.
First, make sure you select "Registration Marks" because this is how the clever Silhouette will know where the images you printed are on the page.
Then, send it to your printer for printing!
 |
| Oops, forgot to show the registration marks on this screen! They should be there as in the previous picture. |
When you've printed out your bookmarks, they will look like this:
I printed mine on adhesive label paper (Silhouette has their own brand, but I didn't have any of it. I used some I found at Officeworks instead.) but of course I could have used Whisper White card stock and my snail adhesive.
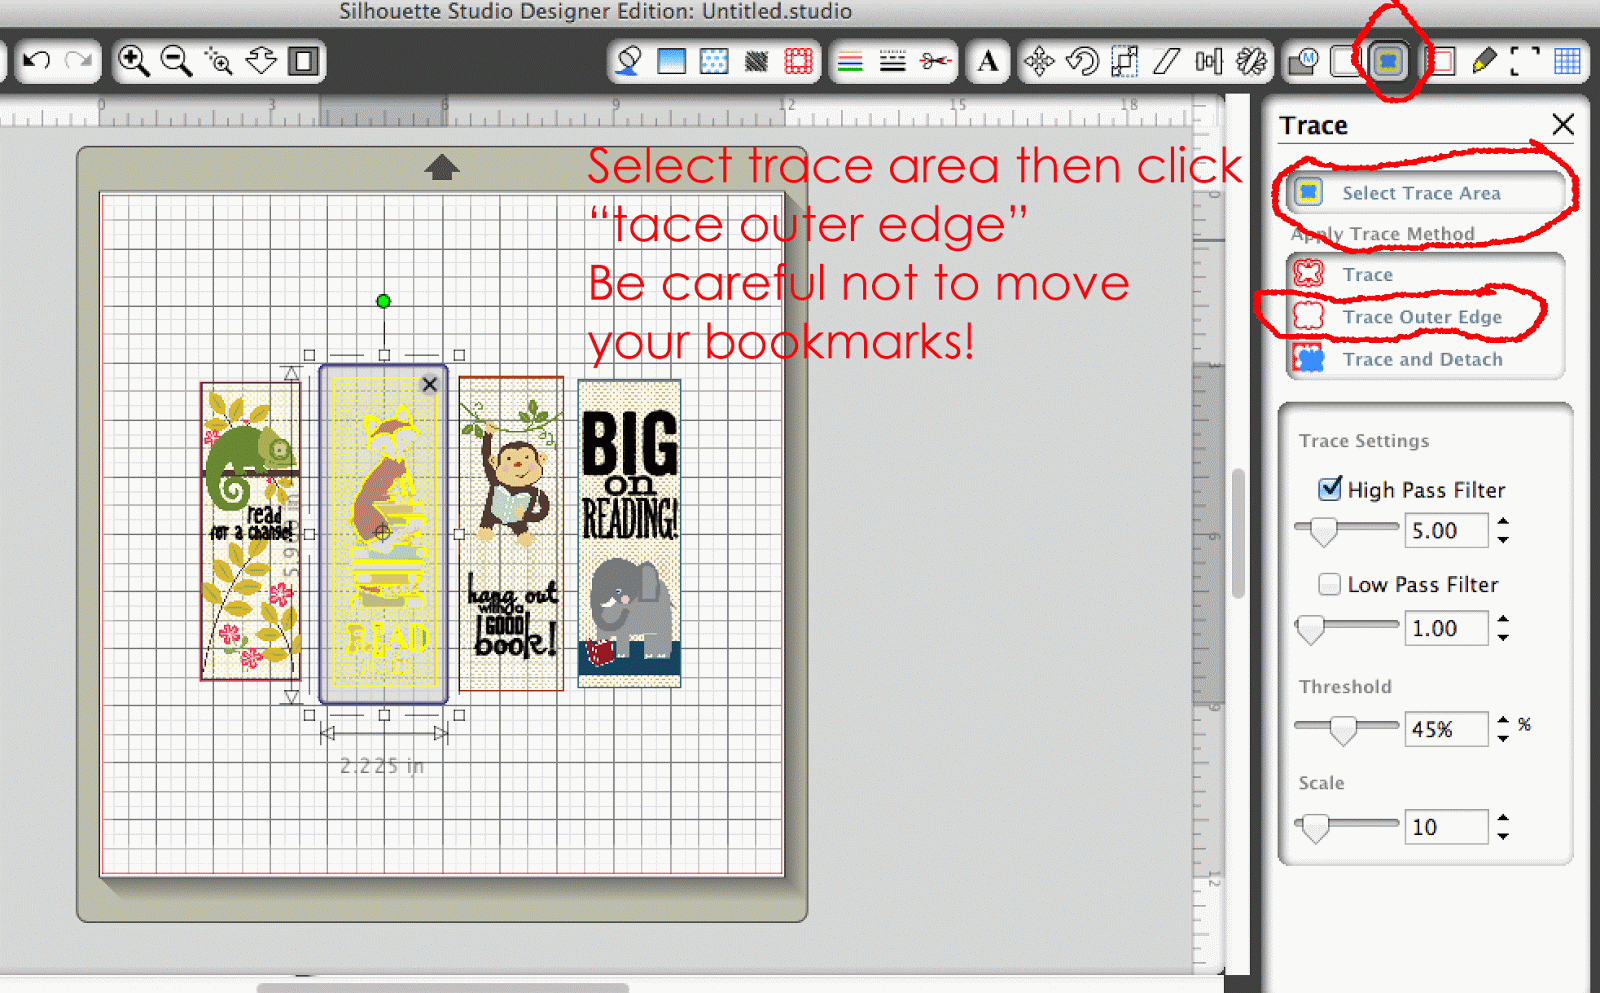
In order for your Silhouette to cut the right lines (in this case, the outside of the Book Buddies panels) you need to tell it what to cut out. To do this, I used the "Trace" feature, as follows:
 |
| Ugh, "TRACE" not "tace!" |
Load your printed bookmarks back into your Silhouette, making sure the little black square is lined up with the blade (that's how it will "read" the registration marks) and make sure your cut settings are appropriate for your material. For example, the sticker paper I used is thinner than the Silhouette brand sticker paper, so I had to tweak the settings and experiment a little to get it to cut perfectly. I found a blade setting of 1 was just fine.
Then press cut or "send to Silhouette" and let it do the work.
Adhere your printed images onto the bookmarks, decorate with ribbon or twine, and you are done.
I hope this was helpful to anyone using MDS with their Silhouette Cameo. Let me know if you have any questions, and I'll try my best to answer them.
What do you think of my Blog and Facebook Page makeover? I made it in MDS in a few minutes. I needed to freshen things up a little!


