Showing posts with label Digital Scrapbooking. Show all posts

Saturday, 4 May 2013

MDS Monday (On Saturday!)

LOL, I meant to schedule this post for Momday, but instead, I've posted it today (Saturday.)  Oops.

Wow, the weeks are rolling by fast, aren't they?  May is always an incredibly busy month for me,  but at lease MDS is making it quick to scrapbook!  Don't get me wrong, I love traditional scrapbooking too, but this is definitely a fast way to get up to date, so you don't feel guilty about all those photos on your computer.

I also tried printing out a photobook with Snapfish - have to say, they did a great job.  It was especially easy with the photobooks I've done in MDS, I just uploaded the pages as .jpeg files, and dropped them into black Snapfish pages.  I tried a soft cover 8 x 8 inch size, as it wasn't very expensive.  It would make a beautiful Mother's Day gift.  Here are some photos to show you how they look:


I've also been doing some challenges in a Facebook group called Simply My Digital Studio run by Heather Summers and Kimberly Van Diepen.  It's a lot of fun!  This week's challenge was a sketch:


And here's what I made:

I used MDS, Hello World Kit, and Fan Fair (for the frame)

What do you think?

Also, there's a fabulous promotion at the moment (Just in time for International Scrapbooking Day):


 Can't go wrong, really!
Contact me, or click here to go shopping!


Hopefully I'll be doing video tutorials soon, so watch this space!


Monday, 29 April 2013

MDS Mondays Sweet Boys Page

I'm going to try to do a post with an MDS project, or tutorial, every Monday, if I can.  
As I haven't mastered the art of video tutorials yet, this is heavy on photographs.

I realise there will be beginners who are new to MDS looking for information - I'm happy to help (not that I'm an expert myself, yet!).  I also highly recommend the training videos at mydigitalstudio.net .  I've found them really helpful.

Here's today's project:

 It's a CASE of my previous layout from here.
 I'll show you how I made it, step by step.
 Supply List MDS Downloads
Background
   Crumb cake textured card stock
Embellishments
    Designer Kits -A Split Second - grid; - flag (re-colored) 
   Designer Kits - Family Fun Photobook -- stitching 5
    Designer Kits - Afternoon Daydream  - button 2
    Antique Brads - brad 4
Stamps
    Designer Kits - Days to Remember overlay
    Designer Kits- Fan Fair - ruler,
   Designer Kit -Comfort Cafe - sweet,
Punches
    Basics/Scallop Circle Punch,
DSP
    Designer Series Paper - Designer Kits - A Split Second
 
       
1.  Start, as always, by opening MDS and clicking new project.  Choose Photobook and Individual pages.


 Then select 12 x 12 square,  pick Create Your Own, and choose a name to save your project.


And here is your blank canvas.  Let's get rid of the unsightly page bleed area shall we?


Just click on view in the menu bar, and click on either "Page bleed area'" or "Remove Page Bleed."  Both work, I don't know why.


Next go to the design centre on the right hand side, and click on Background papers, to see the drop down menu.
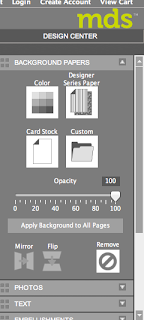


I decided to go with a textured crumb cake card stock.


So now my scrapbook page  has started.  I like the look of sponging around the outside, so I used an overlay (digital stamp).   Back to the Design Centre on the right, click Stamps to reveal the drop down menu.  Click Add Stamps to see a list of all the stamps you have.  


To help me find what I was after I typed "overlay" in the search box and scrolled through the results.


Once applied, it looked like this:


Very grungy, but I was after something more subtle.
That's better!
 I changed the colour of the stamp from the default black to Soft Suede by selecting Change Colour over in the Design Centre.

While I was in the stamp section of the design centre, I picked the ruler stamp from Fan Fair.  


I changed the colour to while, and changed the opacity to 50% because I wanted a "stamped off" look.


 Now to make the pretty DSP strips with the torn edges.  Start by clicking the "Photo" tab over in the Design Centre.  Yes, I said "photo."  You'll see why!


Stretch your photo box into a skinny rectangle, then go to the resource pallette on the left, click background papers, and select the one you like.  I picked DSP from the  A Split  Second kit.  Click and drag the DSP into the photo box.  To create the torn edge, you right click on the DSP, and select "Rip edges" from the menu.  


You'll get to pick which edge is torn, and how much.  Cool!


I did the same thing again with another strip of DSP, and made sure to add a drop shadow.

Then, I added two more photo boxes, and added my photographs.  I added a white mat, and a drop shadow to both.  


I added the flag embellishment (I recoloured it red), and placed a stamp (the word "sweet"), coloured white, and resized to fit inside it.  I also added some stitching there for texture.  The grid paper is another embellishment.

Then for the journalling!
I clicked on the "Freeform" button, and selected Line.  
I  made the line turn 90 degrees, then clicked "ok."


I then moved the line to where I wanted my text to go.  It looks black, but we can fix that later.


I opened a text box, typed my journalling, then selected the text and the line together and right clicked.  From the pop up menu I selected Attach to Shape.


To get rid of the black line, I made the opacity 0.  Magic!
All I needed to do then was to adjust my font and size, so it was exactly the way I wanted it.  

That's the page done, apart from a couple more embellishments to balance the page.


I do intend on figuring out how to use my video camera one day!  Maybe I should get my kids to teach me?

It wasn't until I typed this tutorial out that I realised there are actually quite a few techniques in here, and it might be a little complicated.  I'll try to stick to just one or two techniques in future!  Let me know if you'd like to know more about something I've written about here.  I might have glossed over something for the sake of brevity.


As always, if you'd like to download MDS as a free 30 day trial (or heck, why not just buy it!  You know you'll love it!)  you can get it from my online store HERE


Thursday, 25 April 2013

Learning some cool tricks

I've been having fun learning some of the features of MDS - it really is a fabulous programme.

Here's my latest creation, made for an MDS Challenge group I've just joined:


Supply List:  DSP:  Love Letter;  Punches:  Half Circle; Embellishments:  Afternoon Daydream Designer Kit (Scallop embellishment (recoloured) and button); Stamps:  Vintage Overlays, Comfort Cafe Designer Kit.

I may fiddle with it a little more; I think it might need a little something.  The challenge was Wrapping Your Text - see how I made the text curve around the half circle, and turn the corner under the large photo?

I think I'll do a tutorial post showing how I made the page (and maybe changing it a little).

I learned the technique here:  Stamp With Heather

Fun, isn't it?


Friday, 5 April 2013

MDS Tutorial - How to Use a Template


Tutorial Time!

I've already shown you some of my scrapbooking attemps with MDS, here and here. 

Now I'm going to show you how to make one, step by step.

First:  Assuming you have downloaded the free MDS Trial, or purchased the full MDS (for the extremely reasonable price  of $ 24.95  from my online shop HERE!), go to the little green MDS icon on your desktop, and click it to open MDS.

When you open it, you will see something like this:


Click on the Designer Templates, and you'll see this:


Scroll down to see all the different templates.  I'm using the Vintage Overlay template today.


Click Next, then it takes you to this screen:


Click Next again (this screen is useful if you are doing a multipage photobook and you want to re arrange the pages).


Click insert photographs individually.


Now name your project so you can find it again once it is saved.

And you are ready to drag and drop your photo (I already had some there on my browser) or double-click to add your photo.  See that grey border and barcode thingie?  That's the Page Bleed area.  It doesn't show up on your finished project, so you don't need to do anything with it. You can get get rid of it, if you want to.   Here's how:


 Click View up in the top menu bar, select Bleed Area, and from the next menu, select Remove Bleed Area.  Hey presto!

You're done!

Now, back to the page:  highlight the placeholder text and either delete it if you don't want it there, or overtype it with what you want.


Here's what my page looks like now:


I could save this now, and call it good.    OR.......I could change it up a bit, personalise it some more.


To change the colour on the word "together" I selected it, and the design centre Text list on the right popped open.


This is how you change the colour, font, size of text on your page.  Fun, huh?


I clicked on the "Change Colour" icon and up popped the Stampin' Up! pallette of all their colours, past and present (isn't that COOL?  Your favourite colour NEVER retires in MDS!)


I picked Real Red, to match the centre of the flowers.


Then, I thought I'd add another flower at the top right of the photo.  When I selected one of the original flowers, I noticed that the centre and the petals of the flower are seperate digital layers.  To copy, move etc this flower, I selected both the flower layers and then clicked Arrange on the top menu.


I selected Group from the drop down menu, and both layers are now flattenened into one layer, and can be resized, moved, copied, etc easilly.

 Here's my finished project!

Don't forget to save your project.  Before you can print it, you'll need to save as a .JPG file by following the prompt when you press the "SHARE" icon from the Design Centre Menu.


This is a 12 x 12 template, which you could print at home if you resized it (I'll show you how in another tutorial), or if you download it onto a USB and took it to a printing place (or uploaded it to an online printing place like Snapfish).  I've found that whenever I print a project on my home printer, I get better results if I have exported it as a .jpeg file first

I'll be back soon with another step-by-step project.


Getting closer....

It's nearly that time of year, where the retirement list comes out.  That means the in-colours we've loved the past 2 years are leav...