Sunday, 29 September 2013

On a Roll.....


I just had to re-create (and slightly step up) the card from my last blog post in silver - the gorgeous metallic foil comes in silver and gold, as does the very fine and sparkly glitter.  The other DSP stack - Winter Frost has silver in it too, and of course there's the silver ribbon, and the basic rhinestones to tie in the silver sparkle.  I also used the other special rotary blade, that I can't remember the name of.  I used a small stamp from Hello Lovely to stamp the background with Versamark for a subtle watermark effect.

Stamps:  Christmas Star, Embellished Events, Hello Lovely
Ink: Versamark, Island Indigo
Paper:  Winter Frost DSP Stack, Pool Party, Silver Foil
Fibres:  Silver 1/8" ribbon
Other:  Rotary Trimmer, Paper Snips, Basic Rhinestones, Heat 'n Stick powder, Silver Glitter, Heat Gun.


 Which do you prefer?


Saturday, 28 September 2013

New Stuff


Let me be the first to admit that I joined Stampin' Up! as a Demonstrator 5 years ago (in October) for the discount.  I know I'm not the only one to have seen a Stampin' Up! Catalogue and thought:  "I want it ALL!"  

Can you relate?


Naturally, I am slowly amassing a large collection of papercrafting tools.

The #1, Holy Grail of paper crafting tools is of course - The Perfect Paper Trimmer.

Well, yesterday I received a big brown box from Stampin' Up!  with my latest order  and I finally had a chance to try out the new Rotary Arm attachment-thingy for the Stampin' Trimmer.  (I also purchased a new trimmer so I can have one with the Rotary blade attached all the time, handy for classes!)

I was not prepared for the pure awesomeness.


Don't believe me?  Watch the video!


I love it!  I can keep all the special blades (there's a couple of different ones) in the handy compartment on the back of the trimmer too.

Here is a project I've made with the new Rotary Trimmer, and some other new things!
This card features one of the a la carte stamps available currently - (Christmas Star 132813), which I stamped on the Gold Foil Sheet (Holiday Mini 132622 $6.95) with Versamark and then sprinkled with Heat & Stick powder, which I melted with my heat gun until it was sticky, then sprinkled the super-sparkly Gold Stampin' Glitter (Holiday Mini 132205 $13.95, comes with silver too!) and heat set.  I cut out the star easilly with my paper snips and affixed it to the card with stampin' dimensionals.
I used the small wave rotary blade on my trimmer for the small scallop edge on the edges of the DSP and Cherry Cobbler card stock.  The sentiment, stamped in Cherry Cobbler classic ink is from Embellished Events.

Stamps:  Embellished Events; Christmas Star
Paper:  Gold Foil, Cherry Cobbler A4, Seasons of Style DSP stack
Fibres:  Linen thread
Other:  Heat tool, Heat & stick powder, Gold Stampin' Glitter, Paper Snips, Stampin' Rotary Trimmer, Small Wave blade.

As always, you can order these products from me!

I am in research & development at the moment, playing with new products to come up with class ideas (once the children are back at school), etc.  So watch this space (and my Facebook page) for details to come!


Sunday, 22 September 2013

Pop n' Cuts Dress Up


I have a very glam, fashionable sister (actually, three of them) and I made her a special birthday card with the Pop 'n Cuts die.  I'll admit, it took me a while to warm to these beauties, because they take a bit of practice to get the hang of.

Now that I've taken the plunge, I'll be making more, for sure!

Here's the outside of the card - notice the cute closing at the bottom there?

Paper:  Very Vanilla, Basic Black, Modern Medley DSP, Silver Metallic Card (from the Holiday mini)
Big Shot, Ovals Framelits, Dress Up Framelits, Pop n' Cuts die

And the inside:  suprise!

Stamp:  Bring On the Cake
Paper:  Very Vanilla, Modern Medley DSP, Silver card from the Mini
Other:  Stayzon Jet Black ink, Silver Glimmer Paper, Silver ribbon (from the Mini), Big Shot as before,

Ignore the smudges near the Happy Birthday part - I'd already written on the card when I photographed it, so I had to blur it our with Photoshop.  Taking a photo before I wrote in the card would have been easier!  The dress form was cut out of the silver cardstock from the new Mini - it doesn't look like that in the inside photo, but it looks very shiny in real life.

Just hope my sister likes it!

What do you think?


Wednesday, 18 September 2013

New Holiday Collection Single Stamps


SINGLE STAMPS -- NEW HOLIDAY COLLECTION!
A new, holiday-themed collection of single stamps is now available! The holidays will be here before you know it, and these holiday-themed single stamps may be just what the budget-conscious stamper needs. There are eight different stamps to choose from, six of which coordinate with Framelits dies or punches.  These stamps are only available until 31 January, 2014.  

Details
  • These stamps are available on any order type—customer, demonstrator, workshop, or online.
  • You can find the stamp item numbers on the flyers.
  • Single stamps can be ordered in the online store.
  • These won’t be sent in our typical cases or packaging; they’ll be packaged in cello bags. If you’d like a case for your stamp, you can buy our Clear-Mount Stamp Cases that come in packs of four (item 119105).
  • This offer is available for clear-mount stamps only.
  • The stamps won’t come with a Clear-Mount Block, and you’ll need to buy a block separately if you don’t already have one. The recommended block sizes can be found on the flyer.
  • There’s no limit on how many pieces you can buy.
  • These holiday-themed stamps are only available through 31 January, 2014, so get them while you can!


I think you can never have too many Christmas stamps!  I'll be adding some (or maybe all?) to my next order - I can't resist.

Let me know if you can't resist either and I'll order some for you too - or else you can order them from my Online Store here:  Handmade By Lou's Online Store


Sunday, 15 September 2013

MDS Monday - Lost Boy


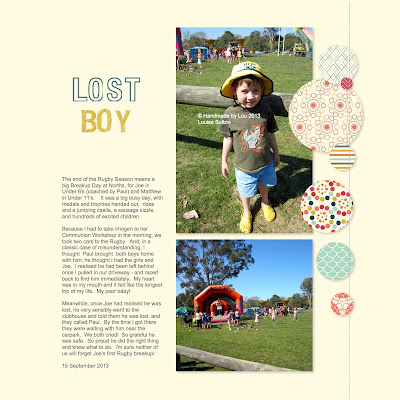
I decided to do a digital scrapbook page with a photo book template in MDS to document a fairly horrible experience - we left my youngest child behind at a Rugby breakup day accidentally.  It had been a busy day, and we took two cars, and we both thought the other had him.  It all ended happily, with my son safe and sound, and he displayed common sense and maturity in the circumstances.  But it was a very frightening experience for all of us, and one that I doubt we'll need a scrapbook to remember.  Nevertheless, I wanted to document this day for the sake of posterity - this will become one of the family stories that will be re-told over the years, and I also like to keep it real.  Not everything in the scrapbook has to be about the good times. 

To make this I used a page layout I liked from the 12 x 12 Designer Kit Family Album.  I'm intending to do many more from this album as I collate the year's events.  I am doing it page by page, but at the end of the year I should have enough done to print off as a Photo book.  I kept it pretty simple, just changing the title of the page and adding my journalling.  I wanted to get the story down, while it was fresh.


I often change up the templates in the Designer kits to personalise them, but it is also fine to use them as they are.  If it ain't broke.....you know.  Sometimes the inspiration strikes, other times you just need to get it done.  

Ugh, I still feel shaky about  what "might have" happened to my brave little boy during the 20 minutes or so we didn't know he was missing.  I'm not sure I'll want him out of my sight to go to school today!


Thursday, 12 September 2013

Launch Recap Part 3


Steph's Cards - love them!

Her first card features some of the gorgeous Crisp Cantaloupe Core'dination card stock, and the new Stylish Stripes Textured Impression embossing folder from the Mini.    Isn't the coffee cup cute?  It's from Perfect Blend, in the main catalogue.

Stamps:  Perfect Blend; Gorgeous Grunge
Ink:  Pistachio Pudding, Crumb Cake, Basic Black
Paper:  Crumb Cake, Whisper White, Crisp Cantaloupe
Other:  Stylish Stripes Embossing Folder, Big Shot, White gel pen


Card 2

This one features the new Wishing You stamp set from the Mini, and Seasons of Style DSP Paper Stack.  Don't you love the crisp combination of Cherry Cobbler and Gumball Green? 

Stamps:  Wishing You
Ink:  Cherry Cobbler, Gumball Green
Paper:  Cherry Cobbler, Gumball Green, Whisper White,  Seasons of Style DSP
Fibres:  Cherry Cobbler Baker's Twine


This card features a Hostess Set, Warmth & Wonder, as well as Winter Frost Speciality DSP.  Heat embossing the Greeting and decorations on the tree in silver give the card a beautiful shimmer.

Paper:  Whisper White:  Winter Frost DSP
Ink:  Coastal Cabana, Versamark
Other:  Silver Embossing Powder, Heat Tool
Fibres:  White Baker's Twine
Stamps:  Warmth & Wonder (Hostess) 
Aren't they pretty cards?  Steph's blog is www.stampingwithsteph.com.au  , so you can go and visit her there and give her some comment love.

And, as always, you can purchase any of these products from me at my Online Store. here: Lou's Online Store!


Wednesday, 11 September 2013

Launch Recap Part 2 - Bec's cards

 One of the nicest things about being a Stampin' up! Demonstrator is the friendships I've made through stamping, with customers, downlines, uplines and sidelines.  Rebecca O'Gorman and I both have the same upline, so we call each other Stampin' Sistas.  She and Stephanie Pike (our upline's upline) have become such good friends to me that it is difficult to imagine not knowing them.  I love doing these events with these girls, they are so talented, hardworking and positive.  

Enough with the love fest!  Let's get back to the cards!

Here are the three cards Bec O'Gorman designed:

Card 1

This card truly looks much better in real life - the combination of Smoky Slate and Strawberry Slush is so pretty, and the Dazzling Diamonds glitter in the centre of the flowers in gorgeous and glittery.  Plus what's not to love with a flower stamp set and matching punch?  It features products from the main catalogue, including Flower Shop, and Bring on the Cake.


Paper:  Strawberry Slush, Whisper White, Smoky Slate
Ink:  Smoky Slate and Strawberry Slush
Fibres:  Strawberry Slush stretch ruffle ribbon
Stamps:  Flower Shop (Wood 130939, $41.95; clear 130942 $33.95) Bring On the Cake (wood 128490 $67.95; clear 121958 $53.95)
Punches:  Pansy (130698, $27.95) 1/2" circle punch (119869, $9.95)
Other:  Big Shot Die Cutting Machine (113439 $149.95); extended cutting pads (113478 $34.95); Tasteful Trim Bigs XL die (120893, $69.95); Perfect Polka Dots Embossing Folder (117335, $13.95)
Dimensionals, Dazzling Diamonds Glitter
Card 2
This gorgeous card features the new Christmas Messages stamp set, Christmas Collectibles Stamp set and matching Christmas Ornament Punch, Very Merry Tags stamp set and beautiful new 1" stitched grosgrain ribbon.

Stamps:  Christmas Messages (Wood 131790 $49.95; Clear 131793 $39.95);  Very Merry Tags  (Wood 130393  $42.95; Clear  130402 $33.95);  Christmas Collectibles (Wood 131772 $37.95; Clear 131775 $29.95)
Ink:  Early Espresso, Cherry Cobbler
Cardstock:  Cherry Cobbler, Very Vanilla, Early Espresso
Fibres:  Cherry Cobbler 1" stitched grosgrain ribbon (132135, $15.95)
Punches:  Christmas Ornament Punch  (132152, $27.95);  Petite Curly Label Punch (129405, $18.95); Dotted Scallop Ribbon Border Punch (119275 $27.95)
Other:  Big Shot Die Cutting Machine (113439, $149.95), Beautifully Baroque embossing folder 130917 $13.95

Card 3
This card features a stamp from the carry over list (they don't appear in the catalogue, but are still available to order), and one of the new Very Merry Tags Stamps that matches the Mosaic punch and embossing folder.  Love that !
Stamps:  Very Merry Tags  (Wood 130393  $42.95; Clear  130402 $33.95);  More Merry Messages  (on the carryover list!  (Wood 126400 $56.95; Clear 126402 $45.95)
Ink:  Smoky Slate; Bermuda Bay
Paper:  Whisper White, Bermuda Bay
Punches:  Scallop Edge Border Punch, Mosaic Punch. 1/2 "Circle punch
Other:   Big Shot Die Cutting Machine (113439, $149.95) Mosaic Embossing Folder
Basic Pearls

Didn't Bec do a great job?  Remember to go visit her blog heartandcraft.com.au and give her some comment love.

As usual, you can order any of these products from me at my online store:  Lou's Online Store


Tuesday, 10 September 2013

Holiday Mini Launch Recap Part 1


I'm back!  Sunday was a full-on day of card making, chatting, shopping and eating at our Mini Catalogue Launch at the Banyo Bowls Club.  Food FX catered the event, and as always, they did a magnificent job.  My kids love to feast on the leftovers (if there are any) after our events.  If you are looking for a caterer I can heartily recommend them.  Here's their website:  Food FX

These are the cards I designed for our Launch featuring gorgeous new Holiday Mini Catalogue products.  Apologies for my photos, I was taking them at night in bad lighting (really I do know better!).

The first card features the new Chevron Border Punch, Winter Frost DSP Paper stack, White Stampin' Chalk Marker (for the faux stitching) and the Love & Joy stamp:

Cardstock:  Crumb Cake; Winter Frost DSP stack (132183, $11.95)
Ink:  Versamark
Stamp:  Love & Joy (wood mount only) (131865, $18.95)
Other: Pool Party embossing powder, heat tool, White Stampin' Chalk Marker (132133, $5.95), Chevron border punch (132154, $37.95), Dimensionals
Nothing too complicated about it, but it is an easy one to mass-produce.  If you are like me, Christmas cards MUST be capable of mass-production, unless you are only planning to send two cards!


The second card showcases the new Seasons of Style Designer Washi Tape, Oh, Goodie! Stamp Set, Silver ribbon (it is so pretty!) and Christmas Messages stamp set.

Stamps:  Oh, Goodie! (wood 131886 $18.95, clear 131889 $14.95) , Christmas Messages (wood 131790 $49.95; clear 131793 $39.95)
Cardstock:  Old Olive A4, Whisper White A4
Ink:  Raspberry Ripple (or alternatively Old Olive)
Other:  Seasons of Style Designer Washi Tape (132155 $8.95)
Ribbon:  Silver 3.2mm ribbon (132137, $8.95)
Deco Labels Collection Framelits (130102 $42.95)
Big Shot Die Cutting Machine (113439 $149.95)
Magnetic Platform (130658 $69.95)
Basic Rhinestones (119246 $8.95)
Glue dots (103683 $8.95)
Lou's Tip:  The Magnetic Platform is fantastic when trying to exactly line up a stamped image or sentiment in a framelit.  I used to do the "Post It Note" trick where a post it note was used to temporarily anchor the framelit in place.  Not any more!  To see a video of the magnetic platform in action, look HERE.

And last of all, Christmas Messages stamp set and Tape It (from the main Catalogue).

Stamp:  Christmas Messages (wood 131790 $49.95; clear 131793 $39.95); Tape It (wood 130712 $46.95, clear 130715 $36.95)
Paper:  Cherry Cobbler A4, Whisper White A4
Ink:  Sahara Sand, Cherry Cobbler; Baked Brown Sugar, Gumball Green
Fibres:  Cherry Cobbler seam binding ribbon (120992, $11.95); Whisper White Baker's Twine (124262 $4.95)
Other:  Chalk Talk Framelits (129983 $42.95)
Big Shot Die Cutting Machine (113439 $149.95) Magnetic Platform (130658 $69.95)
Basic Rhinestones (119246 $8.95) 
Again, a simple card, that works out to be extremely affordable because you are stamping the Washi strips instead of using tape.  Of course, you could reproduce this card with Washi tape if you like, but it will be expensive if you are planning on making 20-75 cards.  This way is cheaper, and you can make the Washi tape any colour you wish.

As always, if you'd like to order these products so you can make these cards yourself, email me, or else head on over to my Online Store to place an order.  Click to go to Handmade By Lou's Store

Next post I'll be showing Rebecca O'Gorman's cards - they are so pretty!


Monday, 2 September 2013

New Baby love! MDS Monday is back!

New babies are just delicious, aren't they?  My beautiful sister Jane had a divine baby girl just over a week ago - little Lucy.

Hello sweetie!

 I don't know if my sister will be sending out birth announcements, but I couldn't resist knocking some up with the ready-made templates in My Digital Studio.  Which do you prefer?

So easy to just pop in all the details and a cute photo - then save as a .jpeg and upload to the printer of your choice.  Done.


Did you know you can change the photo into black & white in MDS if you think it suits your project better?  Sweet!


 I must say I love the trendy chalkboard look at the moment, so that's probably my favorite. 

This is what I used:

Hello World Digital Kit - not only announcements, but an entire Baby Shower from cupcake toppers to thank you notes in this kit - and you can easily customize it for any occasion.


You can purchase them as digital downloads from my online store, naturally!  Louise's awesome online store


Getting closer....

It's nearly that time of year, where the retirement list comes out.  That means the in-colours we've loved the past 2 years are leav...